
みなさんこんにちは。
旅ブロガーのJonyとAi(@10to1_travel)です。
今回は THE THOR(ザ・トール)の目次デザインを 22個、紹介します。THE THOR(ザ・トール)の目次は究極にシンプルなのでもう少しオシャレにしたい人も多いと思います。
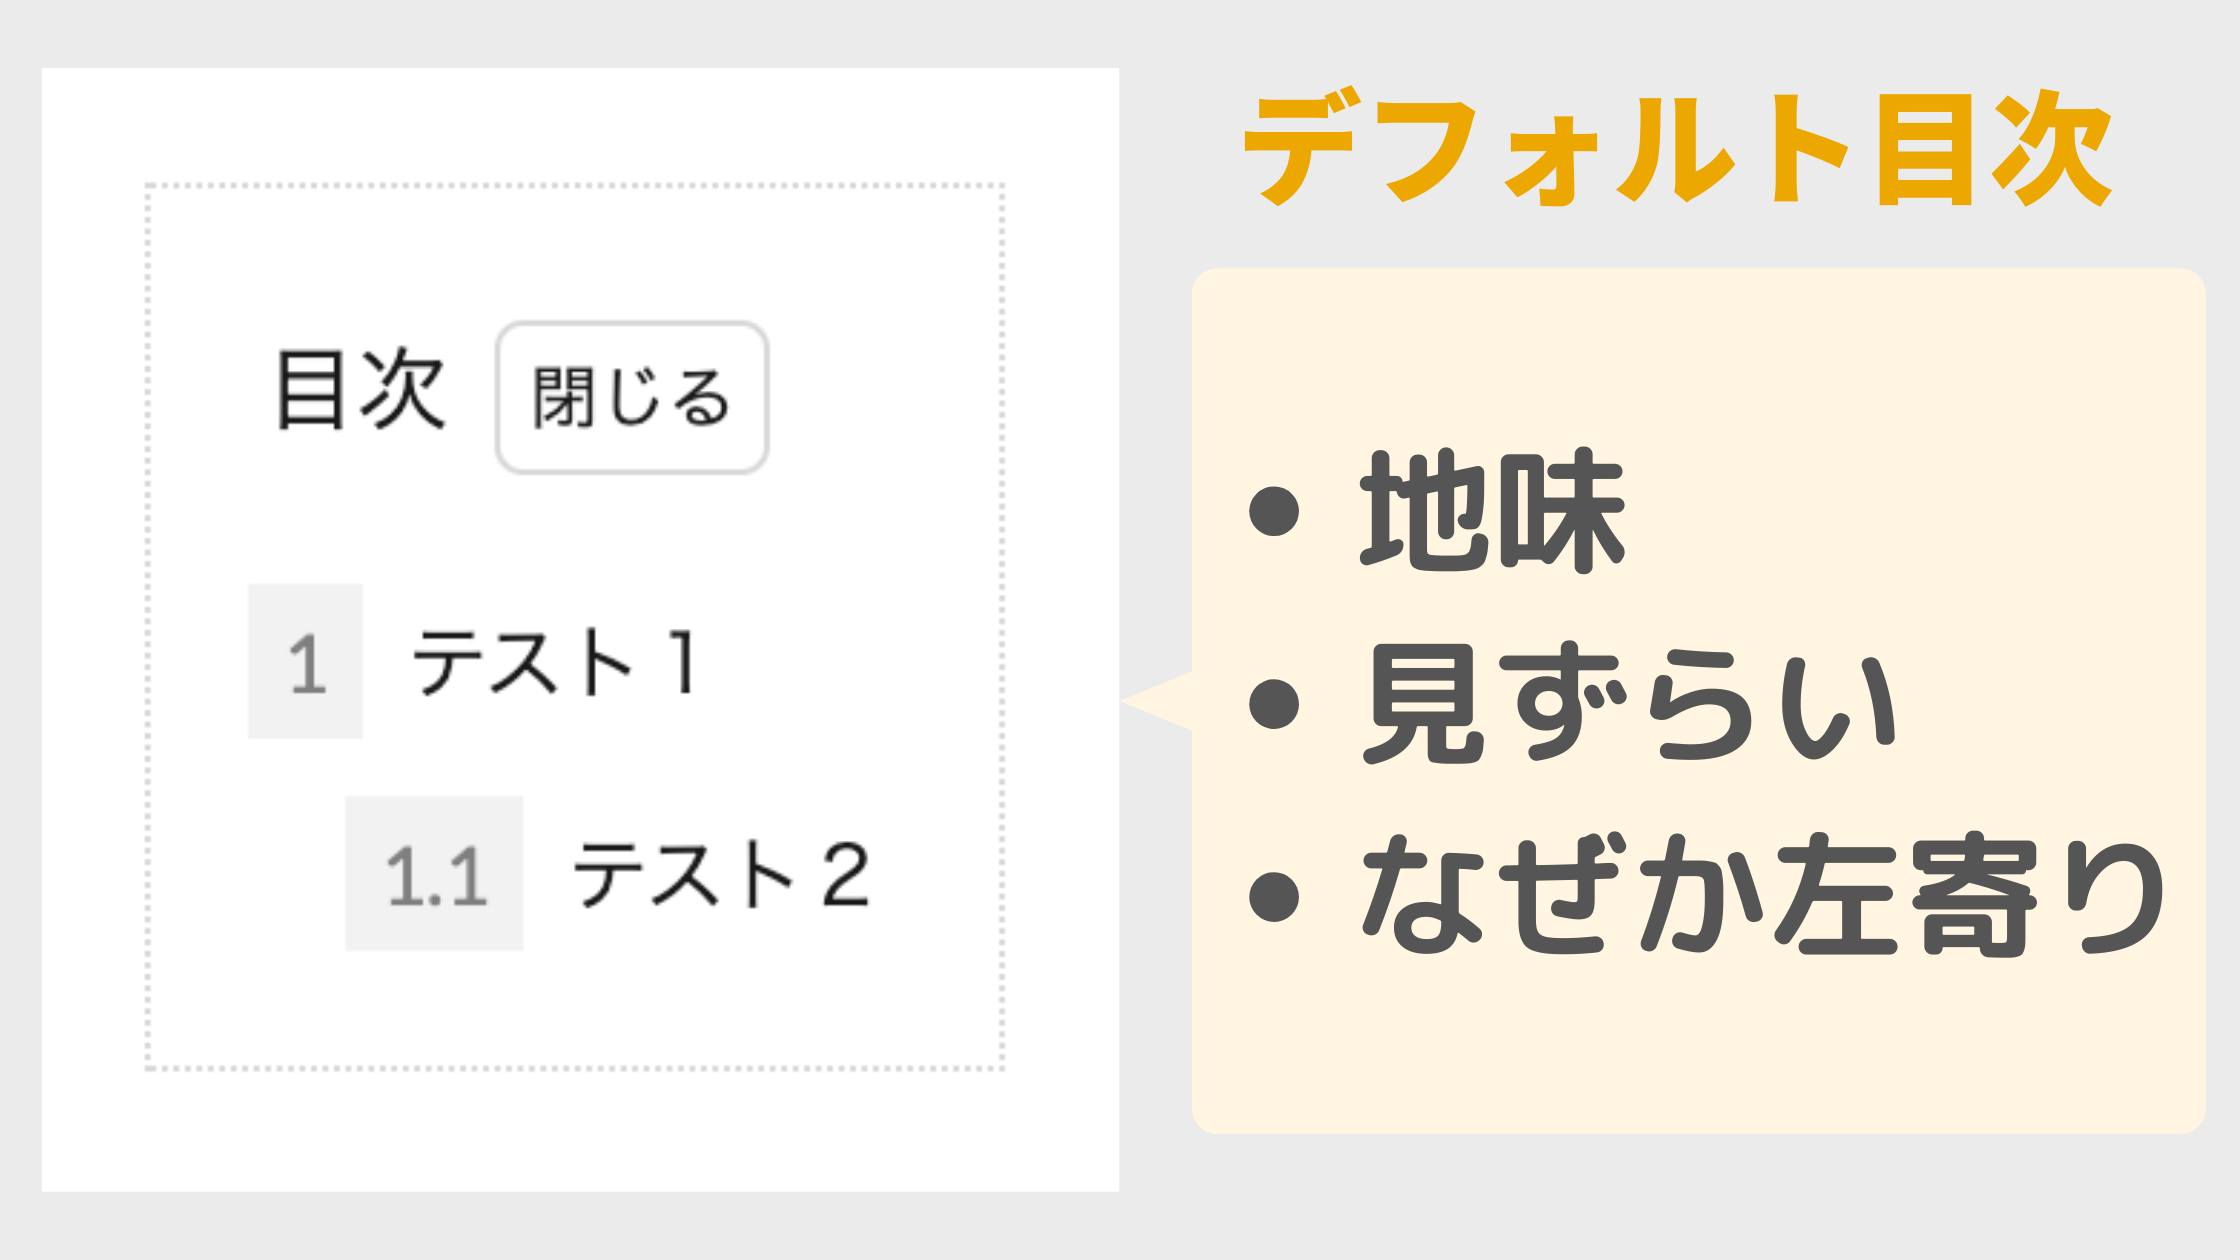
- 地味
- 見ずらい
- なぜか左寄り
その前に、THE THOR(ザ・トール)の目次をまだ設定できてない人、表示の方法を知りたい人は以下の記事をご覧ください。
Ai THE THOR(ザ・トール)の目次設定と記事内に表示する方法を解説するよ! こんな人にオススメ THE THORの目次設定を詳しく知りたい記事内に表示する方法が知りたい目次が表示されない!時の解決策が知[…]
- 1 THE THORの目次カスタマイズはCSSを使う!
- 2 THE THOR コピペで作る目次デザイン23選:CSSカスタマイズ
- 2.1 THE THORの目次の横幅を大きく
- 2.2 THE THORの目次を真ん中に
- 2.3 シンプルボーダー
- 2.4 シンプルボーダー2
- 2.5 よく見るサイトの目次風
- 2.6 背景塗りつぶし
- 2.7 上下ボーダー
- 2.8 上下ボーダー【開閉なし】
- 2.9 二重線の枠
- 2.10 破線の枠
- 2.11 左右二重線
- 2.12 ステッチ風
- 2.13 ステッチ風【開閉なし】
- 2.14 SANGO風
- 2.15 SANGO風2(影あり)
- 2.16 SANGO風3【開閉なし】
- 2.17 SANGO風4【開閉なし】
- 2.18 サルワカさん風【開閉なし】
- 2.19 シンプルゴージャス(JIN風)
- 2.20 AFFINGER風
- 2.21 ここあさん参照の目次
- 2.22 10to1オリジナル目次
- 2.23 左線あり目次
- 3 THE THOR 目次カスタマイズを調節する方法
- 4 THE THORの目次をカスタマイズする時の注意点
- 5 導入済みのブログを紹介させてください!
- 6 THE THOR コピペで作る目次デザインのカスタマイズ:まとめ
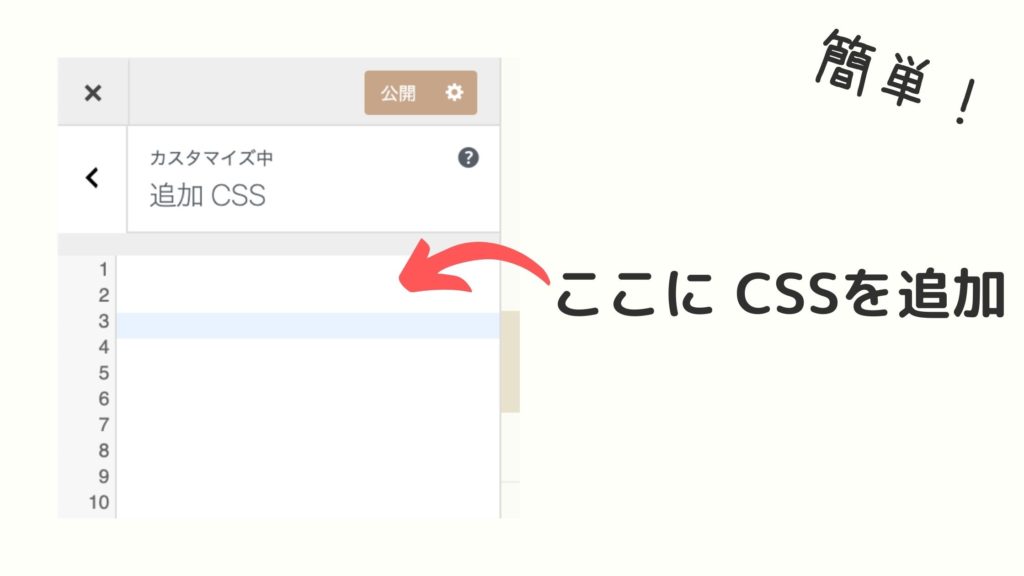
THE THORの目次カスタマイズはCSSを使う!
THE THOR(ザ・トール)の目次カスタマイズは CSSを使います。まずは、CSSでカスタマイズする方法を 2ステップで紹介します。
と言ってもコピペだけ、初心者の方でもとても簡単に行うことができます。
- ステップ1CSSをコピーする目次のカスタマイズで使う CSSコードをコピーします。
- ステップ2追加CSSに貼り付けるTHE THOR(ザ・トール)の追加CSSにコピーしたコードを貼り付けます。
※カスタマイズは自己責任でお願いします。
ステップ1:CSSをコピーする
ステップ1ではカスタマイズに使う CSSコードをコピーします。例によって、今回紹介するデザインの中のひとつを使用します。
まず以下の CSSをコピーします。
- CSSをコピーする
- 右の黄色の「コピーする」ボタンでワンクリックでコピーすることができます。
/*目次 カスタマイズ*//*目次 ボディ*/
.content .outline {
position:relative;
border: 3px solid #606060;
padding: 10px ;
padding-left:0px;background:#fffff9;
}
/*H2見出しの番号*/
.content .outline__number{
width:1.8em;height:1.8em;
padding:0;
line-height:1.8em;
text-align:center;
background:#cda34f;
color:#ffffff;
border-radius:50%;
}
/*H3見出しの番号*/
.content li ul li .outline__number{
font-weight:bold;
background:transparent;
color:#606060;
width:auto;
}
/*テキストカラー*/
.content .outline__link {
transition-duration:0.2s;
display: block;
color:#606060;
}
/*マウスオーバー時のホバーエフェクト*/
.content .outline__link:hover {
transition-duration:0.2s;
color:#cda34f;
}
/*目次タイトル*/
.outline__title {
color:#505050;
font-weight: 700;
width:100%;
padding: 0px 0px 0px 20px;
}.content .outline__switch{
right:1.5rem;
top:10px;
}
/*OPEN CLOSEのカスタマイズ*/
.content .outline__toggle:checked + .outline__switch::before {
content: "[ ▲ CLOSE]";
position:absolute;
right:10px;
color:#e34717;
}
.content .outline__toggle:checked + .outline__switch + .outline__list {
margin-top: 1rem;
}.content .outline__switch::before {
content: "[ ▼ OPEN ]";
border: 0;
position:absolute;
right:10px;
color:#e34717;
}
/*ボーダー装飾*/
.content .outline__switch + .outline__list {
background: transparent;
}
.content .outline__switch + ul.outline__list {
margin-left:0;
margin-right:0;
border-top:4px dotted #cfcfcf;
}
.content .outline__switch + .outline__list-2 li:first-child{
margin-top:1.0em;
}
.content .outline__switch + .outline__list-2 li ul li:first-child{
margin-top:0.5em;
}
.outline__list-2 > li > a{
font-weight:700;
}
/*タイトル横のアイコン*/
.outline__title:before{
font-family: "icomoon";
content: "\e92f";
margin-right:5px;
}
/* 目次の頭揃え */
.outline__link {
padding-left:2em;
text-indent: -2em;
}
.outline__number{
text-indent: 0;
}
.outline__list-3 .outline__link {
padding-left:3em;
text-indent: -2.85em;
}
@media only screen and (min-width: 992px){
.outline__list-2 > li > a{
font-weight:700;
}
.content .outline {
width:90%;
margin:3rem 5%;
}
}
@media only screen and (max-width: 991px){
.content .outline {
width:100%;
}
}
ステップ2:追加CSSに貼り付ける
ステップ2ではコピーした CSSを THE THOR(ザ・トール)の「追加CSS」に貼り付けて、カスタマイズを反映させます。
WordPressの管理画面から、
と進み、追加CSS内に先ほどコピーしたコードを貼り付けます。
THE THOR(ザ・トール)の追加CSSについてもっと詳しく知りたい方は以下の記事をご覧ください。
みなさんこんにちは。 THE THOR(ザ・トール)のデザインをもっと細かくカスタマイズしたい時に、ネットで調べたら【コピペだけ!】ってタイトルありますよね。 でも コピペってどこに?追加 CSSって[…]
以上でカスタマイズは完了です。
THE THOR コピペで作る目次デザイン23選:CSSカスタマイズ
それでは THE THOR(ザ・トール)の目次デザインを23個 紹介します。
今回の THE THOR(ザ・トール)の目次カスタマイズで参考にさせていただいた記事です。からあげ棒さん、ここあさん共に私たちが毎日サイト訪問するくらい勉強にさせていただいてるブロガーさんです。
THE THOR(ザ・トール)のカスタマイズが好きなら必見のお二人なのでぜひ参照ください!
ここあです。 WordPressテーマ「THE THOR」には デフォルトで記事の目次を表示させる機能があるので …

THE THORの目次の横幅を大きく

まずはシンプルに THE THOR(ザ・トール)の目次の横幅を大きくします。
横幅は 100%です。
- CSSをコピペする
-
.content .outline{
width:100%;
}
THE THORの目次を真ん中に

続いて、幅を 90%に設定して少し狭くした時の中央揃えのデザインです。幅を狭くすることにより、目次の存在感と見やすさが引き立ちます。
- CSSをコピペする
-
.content .outline{
width:90%;
margin:0 auto;
display:block;
position:relative;
}
シンプルボーダー
シンプルなボーダーで囲みました。意外とオシャレで一番使いやすいかもです。
- CSSをコピペする
-
.content .outline{
width:90%;
margin:0 auto;
display:block;
position:relative;
border: solid 3px #333;
background: #fcfcfc;
}
.content .outline__item{
background: #fcfcfc;
}
.content .outline__toggle:checked + .outline__switch + .outline__list {
margin-top: 1rem;
background:initial;
}
シンプルボーダー2
シンプルーボーダーの色違いです。プラス角を丸くして項目の数字の周りを丸くしました。
- CSSをコピペする
-
.content .outline{
width:90%;
margin:0 auto;
display:block;
position:relative;
border: solid 3px #89c3eb;
background: #fffff9;
border-radius:5px;
}
.content .outline__item{
background: #fffff9;
}
.content .outline__number{
width:1.9em;
height:1.9em;
padding:0;
line-height:1.8em;
text-align:center;
background:#89c3eb;
color:#fff;
border-radius:50%;
}
.outline__list .outline__list-3 .outline__number{
background:initial;
color:#777;
margin-left:15px;
width:auto;
}
.outline__title{
color:#777;
font-weight:bold;
font-size:18px;
}
.content .outline__toggle:checked + .outline__switch + .outline__list {
margin-top: 1rem;
background:initial;
}
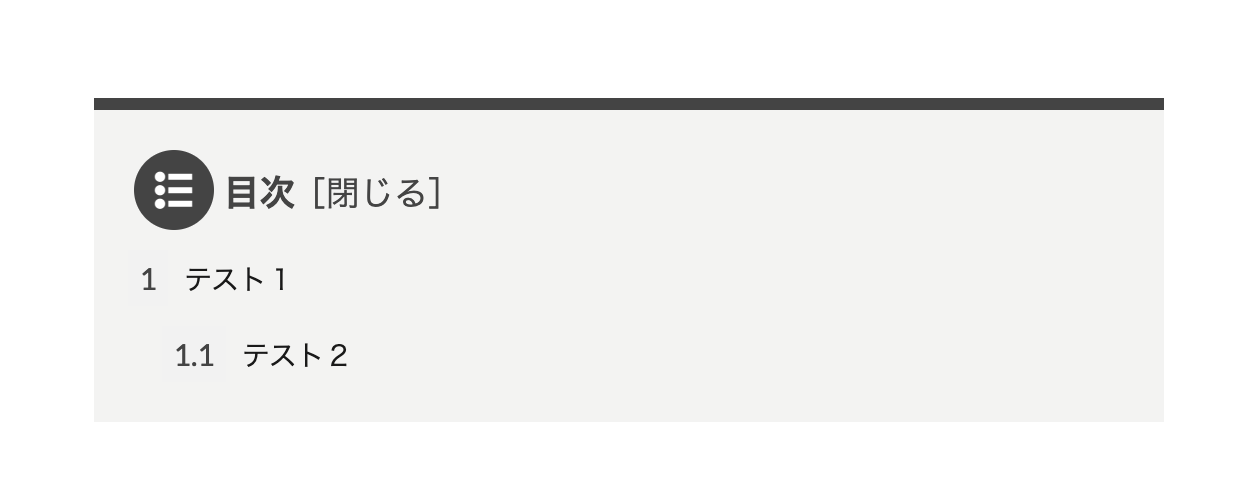
よく見るサイトの目次風
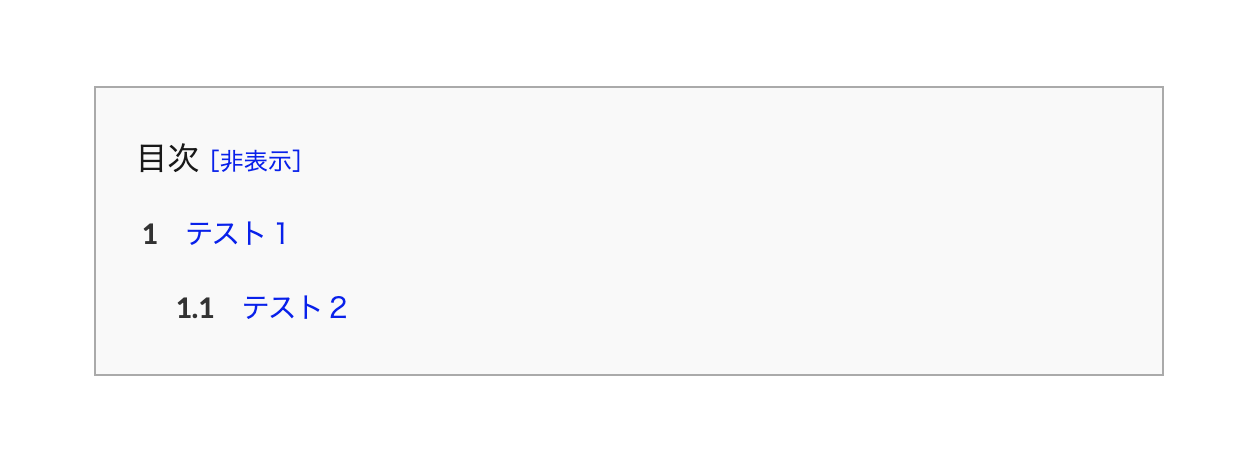
ネットでよく見るサイトの目次風です。テキストを青にすることにより、読者に「クリックできる目次」ということをアピールできます。
意外と使いやすく、カチッとしたサイトにおすすめです。
- CSSをコピペする
-
.content .outline{
background:#f9f9f9;
border:1px solid #aaa;
width:90%;
display:block;
margin:0 auto;
}
.content .outline__item{
background:#f9f9f9;
}
.content .outline__number{
background:none;
color: #333;
font-weight:bold;
}
.content .outline__link{
color:#0000ee;
}
.content .outline__toggle:checked + .outline__switch::before {
content: "[非表示]";
border:none;
margin-left:-10px;
color:#0000ee;
}
.content .outline__toggle:checked + .outline__switch + .outline__list {
margin-top: 1rem;
background:initial;
}
.content .outline__switch::before {
content: "[表示]";
border:none;
margin-left:-10px;
color:#0000ee;
}
背景塗りつぶし
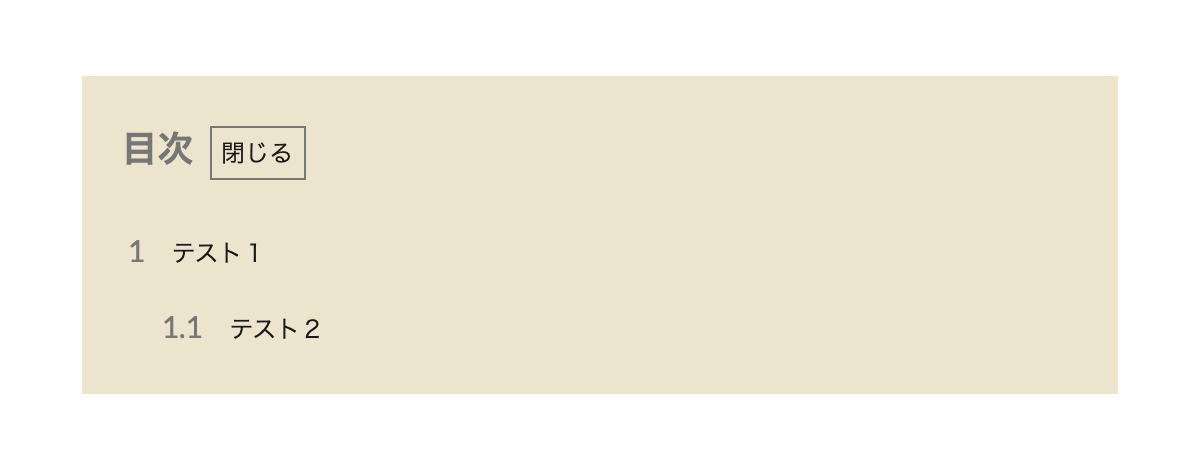
背景色を塗りつぶした目次デザインです。これもオシャレですね。
- CSSをコピペする
-
.content .outline{
width:90%;
margin:0 auto;
display:block;
position:relative;
border:none;
background: #ede4cd;
}
.content .outline__item{
background: #ede4cd;
}
.content .outline__number{
font-size:15px;
background:initial;
color:#777;
}
.outline__title{
color:#777;
font-weight:bold;
font-size:18px;
}
.content .outline__switch::before{
border: 1px #777 solid;
border-radius:0px;
}
.content .outline__toggle:checked + .outline__switch + .outline__list {
margin-top: 1rem;
background:initial;
}
上下ボーダー
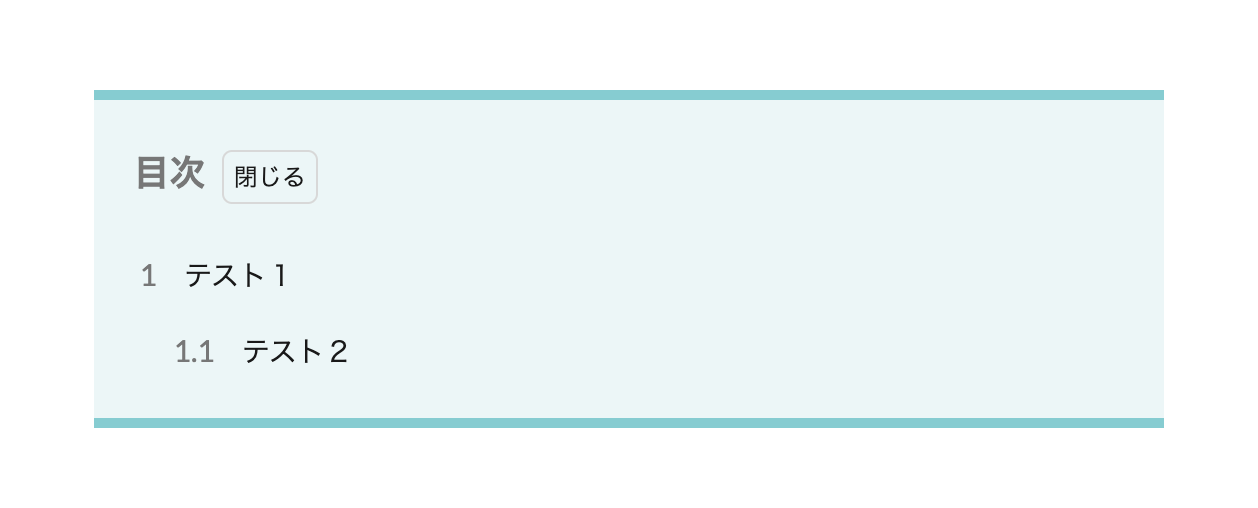
上下にボーダーを付けたオシャレな目次です。閉じた見栄えもキレイなのでオススメです。
- CSSをコピペする
-
.content .outline{
width:90%;
margin:0 auto;
display:block;
position:relative;
border-right:none;
border-left:none;
border-top:solid 5px #83ccd2;
border-bottom:solid 5px #83ccd2;
background:#ebf6f7;
}
.content .outline__item{
background:#ebf6f7;
}
.content .outline__number{
font-size:15px;
background:initial;
color:#777;
}
.outline__title{
color:#777;
font-weight:bold;
font-size:18px;
}
.content .outline__toggle:checked + .outline__switch + .outline__list {
margin-top: 1rem;
background:initial;
}
上下ボーダー【開閉なし】
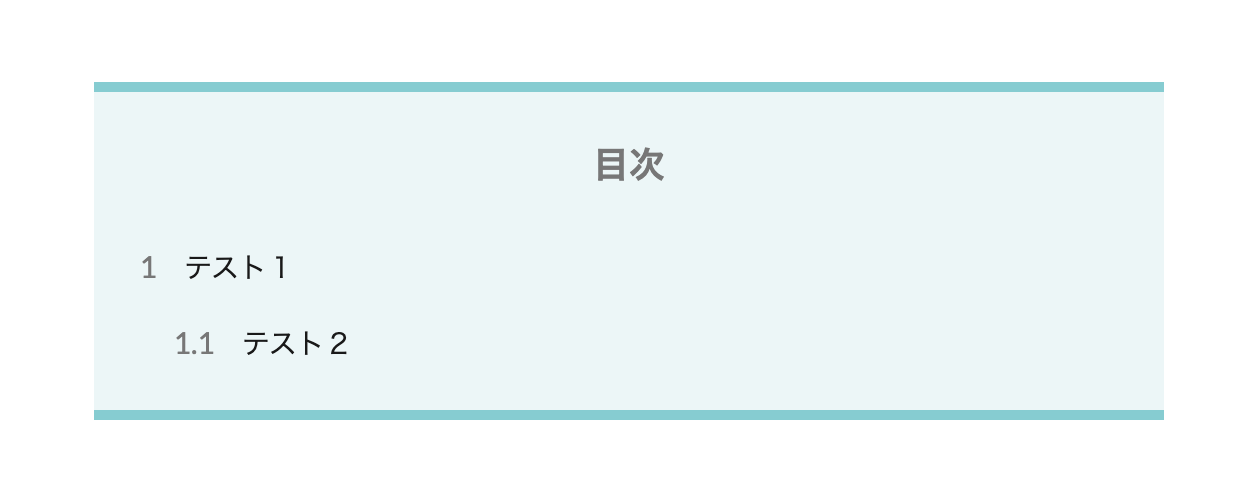
上記の目次の【開閉ない】バージョンです。さらに目次タイトルを真ん中に持ってきたことにより、よりオシャレになりました。
- CSSをコピペする
-
.content .outline{
width:90%;
margin:0 auto;
display:block;
position:relative;
border-right:none;
border-left:none;
border-top:solid 5px #83ccd2;
border-bottom:solid 5px #83ccd2;
background:#ebf6f7;
}
.content .outline__item{
background:#ebf6f7;
}
.content .outline__number{
font-size:15px;
background:initial;
color:#777;
}
.outline__title{
color:#777;
font-weight:bold;
font-size:18px;
text-align:center;
display:block;
}
.content .outline__switch::before{
display:none;
}
.content .outline__toggle:checked + .outline__switch + .outline__list {
margin-top: 1rem;
background:initial;
}
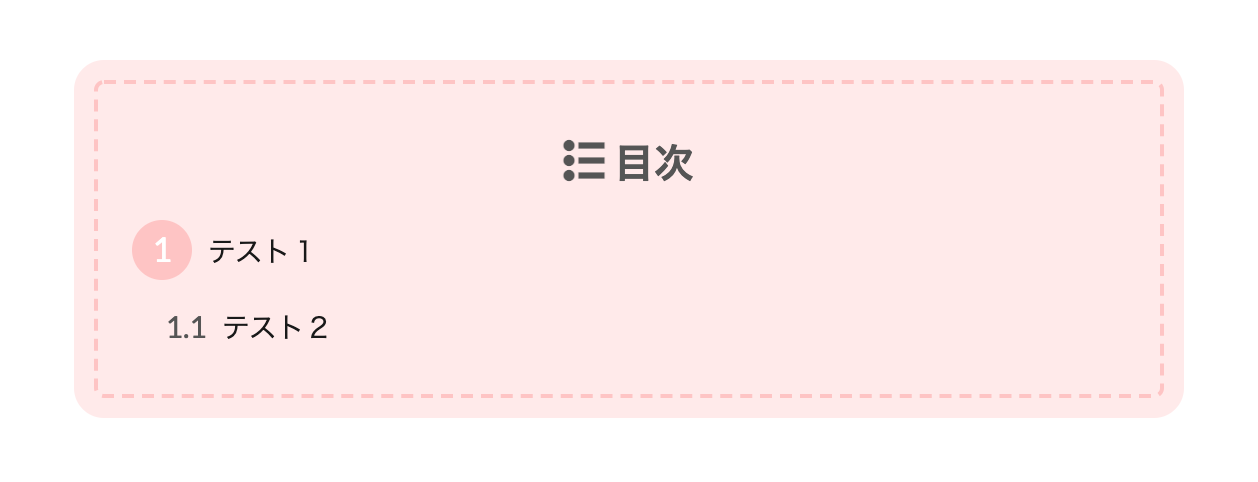
二重線の枠
外枠を二重線にしました。色によってはキレイめにもカジュアルにもなりますね。
- CSSをコピペする
-
.content .outline{
width:90%;
margin:0 auto;
display:block;
position:relative;
border:double 5px #93ca76;
background:#fff;
}
.content .outline__item{
background:#fff;
}
.content .outline__number{
font-size:15px;
background:initial;
color:#93ca76;
}
.outline__title{
color:#777;
font-weight:bold;
font-size:18px;
}
.content .outline__switch::before{
position:absolute;
right:10px;
content:"OPEN";
}
/*OPEN CLOSEのカスタマイズ*/
.content .outline__toggle:checked + .outline__switch::before {
content: "[CLOSE]";
position:absolute;
right:10px;
color:#e34717;
}
.content .outline__toggle:checked + .outline__switch + .outline__list {
margin-top: 1rem;
background:initial;
}
.content .outline__switch::before {
content: "[OPEN ]";
border: 0;
position:absolute;
right:10px;
color:#e34717;
}
破線の枠
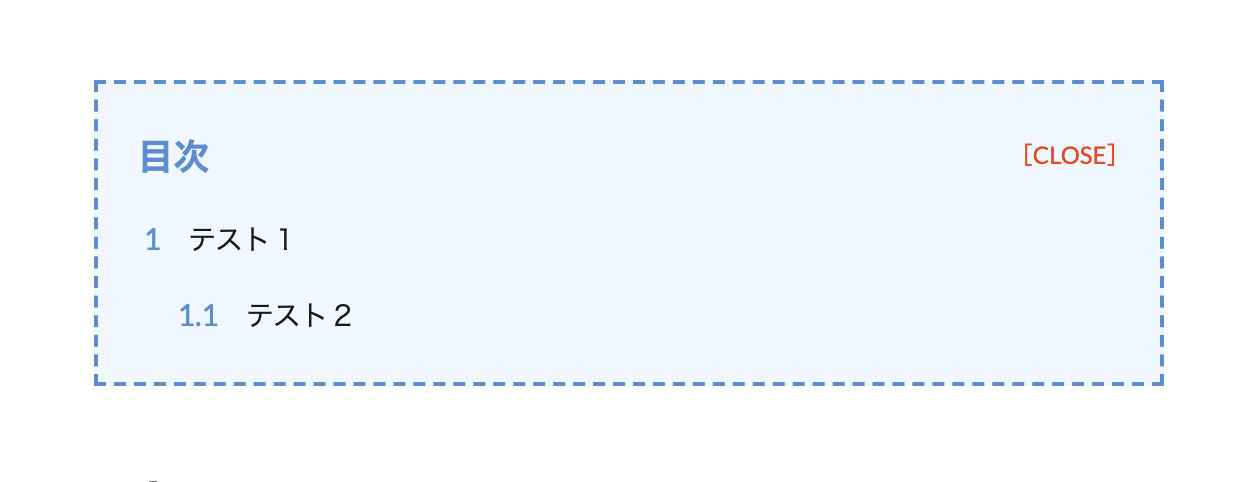
外枠を破線にしてみました。後で思ったんですが、少しマナブログさん風ですね。
- CSSをコピペする
-
.content .outline{
position:relative;
width:90%;
margin:0 auto;
display:block;
background: #f0f7ff;
border: dashed 2px #5b8bd0;
}
.content .outline__item{
background:#f0f7ff;
}
.content .outline__number{
font-size:15px;
background:initial;
color:#5b8bd0;
}
.outline__title{
color:#5b8bd0;
font-weight:bold;
font-size:18px;
}
.content .outline__switch::before{
position:absolute;
right:10px;
content:"OPEN";
}
/*OPEN CLOSEのカスタマイズ*/
.content .outline__toggle:checked + .outline__switch::before {
content: "[CLOSE]";
position:absolute;
right:10px;
color:#e34717;
}
.content .outline__toggle:checked + .outline__switch + .outline__list {
margin-top: 1rem;
background:initial;
}
.content .outline__switch::before {
content: "[OPEN ]";
border: 0;
position:absolute;
right:10px;
color:#e34717;
}
.content .outline__switch+.outline__list{
background:initial;
}
左右二重線
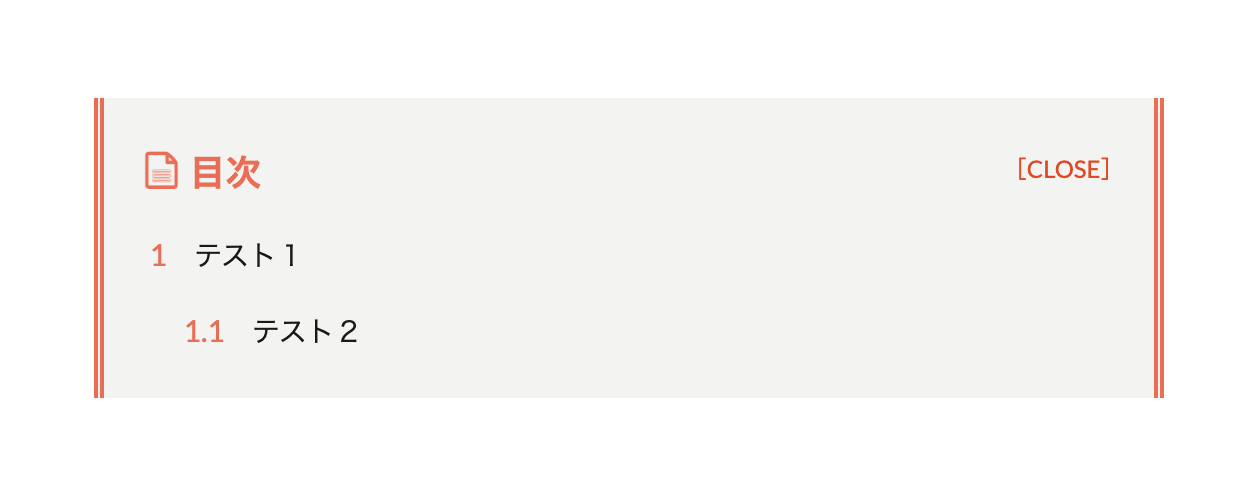
左右に二重線を付けました。こちらもだいぶカジュアルになりますね!ちょっと色味が失敗したかもなので皆さんのセンスでオシャレにしてください。
- CSSをコピペする
-
.content .outline{
position:relative;
width:90%;
margin:0 auto;
display:block;
background:#f3f3f2;
border-right:double 5px #ec6d51;
border-left:double 5px #ec6d51;
border-top:none;
border-bottom:none;
}
.content .outline__item{
background:#f3f3f2;
}
.outline__title:before{
font-family: "icomoon";
content: "\e92f";
margin-right:5px;
}
.content .outline__number{
font-size:15px;
background:initial;
color:#ec6d51;
}
.outline__title{
color:#ec6d51;
font-weight:bold;
font-size:18px;
}
.content .outline__switch::before{
position:absolute;
right:10px;
content:"OPEN";
}
/*OPEN CLOSEのカスタマイズ*/
.content .outline__toggle:checked + .outline__switch::before {
content: "[CLOSE]";
position:absolute;
right:10px;
color:#e34717;
}
.content .outline__toggle:checked + .outline__switch + .outline__list {
margin-top: 1rem;
background:initial;
}
.content .outline__switch::before {
content: "[OPEN ]";
border: 0;
position:absolute;
right:10px;
color:#e34717;
}
ステッチ風
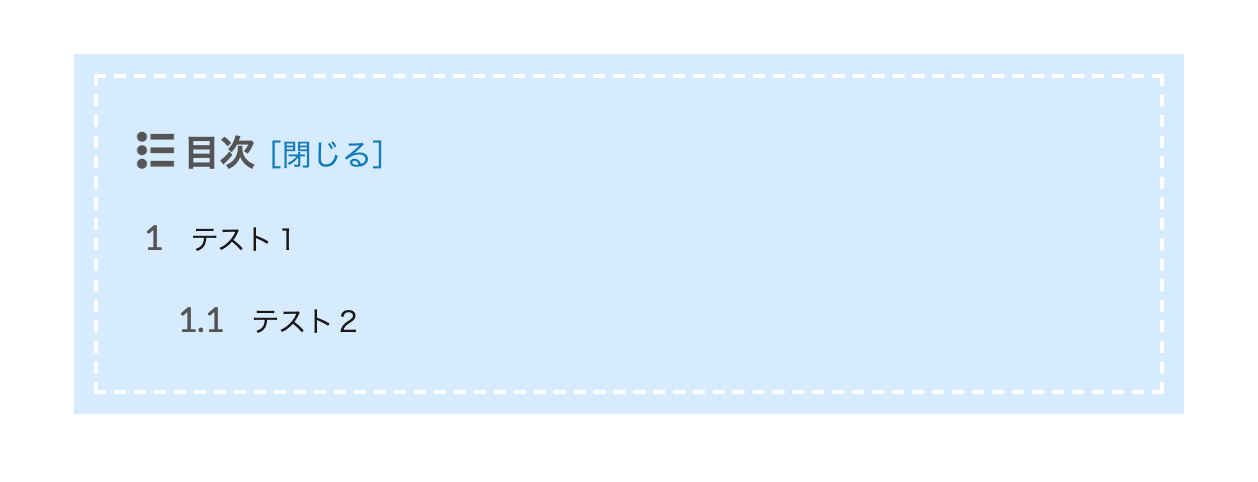
ステッチ風のデザインです。可愛いデザインですね。
背景色を変えるときは、backgroundとbox-shadowの両方を同じカラーに設定してください。
- CSSをコピペする
-
.content .outline{
width:90%;
margin:0 auto;
display:block;
position:relative;
background: #d6ebff;
box-shadow: 0px 0px 0px 10px #d6ebff;
border: dashed 2px #fff;
}
.content .outline__item{
background:#d6ebff;
}
.content .outline__number{
background:none;
font-size:17px;
color:#555;
}
.outline__title:before{
font-family: "icomoon";
content: "\ea51";
margin-right:5px;
color:#555;
}
.outline__title{
color:#555;
font-weight:bold;
font-size:18px;
}
.content .outline__toggle:checked + .outline__switch::before {
content: "[閉じる]";
margin-left:-10px;
color:#007bbb;
font-size:15px;
}
.content .outline__toggle:checked + .outline__switch + .outline__list {
margin-top: 1rem;
background:initial;
}
.content .outline__switch::before {
content: "[開く ]";
border:none;
margin-left:-10px;
font-size:15px;
color:#007bbb;
}
ステッチ風【開閉なし】
上記のステッチ風の色違いです。さらに角を丸くしてより可愛くしてます。
こちらは【開閉なし】のデザインです。
- CSSをコピペする
-
.content .outline{
width:90%;
margin:0 auto;
display:block;
position:relative;
background: #ffeaea;
box-shadow: 0px 0px 0px 10px #ffeaea;
border: dashed 2px #ffc3c3;
border-radius:5px;
}
.content .outline__item{
background:#ffeaea;
}
.content .outline__number{
background:none;
font-size:17px;
width:1.8em;
height:1.8em;
padding:0;
line-height:1.8em;
text-align:center;
background:#ffc3c3;
color:#fff;
border-radius:50%;
}
.content li ul li .outline__number{
background:transparent;
color:#555;
width:auto;
font-size:15px;
}
.outline__title:before{
font-family: "icomoon";
content: "\ea51";
margin-right:5px;
color:#555;
}
.outline__title{
color:#555;
font-weight:bold;
font-size:20px;
display:block;
text-align:center;
}
.content .outline__toggle:checked + .outline__switch::before {
content: "[閉じる]";
display:none;
}
.content .outline__toggle:checked + .outline__switch + .outline__list {
margin-top: 1rem;
background:initial;
}
.content .outline__switch::before {
content: "[開く ]";
display:none;
}
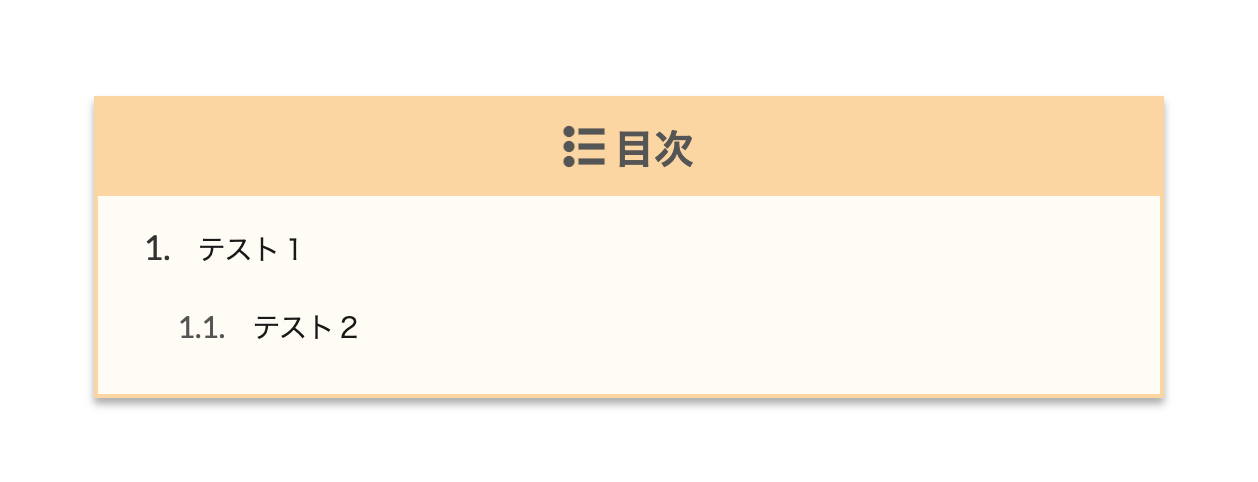
SANGO風
超絶オシャレな WordPress有料テーマの SANGO風です。もしくは Cocoon風でもある、オシャレなサイトに使用されがちな目次デザインです。
今回の中で一番気に入ってます。
- CSSをコピペする
-
.content .outline{
position:relative;
width:90%;
margin:0 auto;
display:block;
background:#f3f3f2;
border-right:none;
border-left:none;
border-bottom:none;
border-top:solid 6px #444;
}
.content .outline__item{
background:#f3f3f2;
}
.outline__title:before{
display:inline-block;
font-family: "icomoon";
content: "\ea51";
margin-right:5px;
background: #444;
width:40px;
height:40px;
text-align:center;
border-radius:50%;
padding-top:4px;
color:#fff;
}
.content .outline__number{
font-size:15px;
color:#444;
}
.outline__title{
color:#444;
font-weight:bold;
font-size:18px;
}
.content .outline__toggle:checked + .outline__switch::before {
content: "[閉じる]";
font-size:17px;
margin-left:-10px;
color:#444;
}
.content .outline__toggle:checked + .outline__switch + .outline__list {
margin-top: 1rem;
background:initial;
}
.content .outline__switch::before {
content: "[開く ]";
border: 0;
margin-left:-10px;
color:#444;
font-size:17px;
}
SANGO風2(影あり)
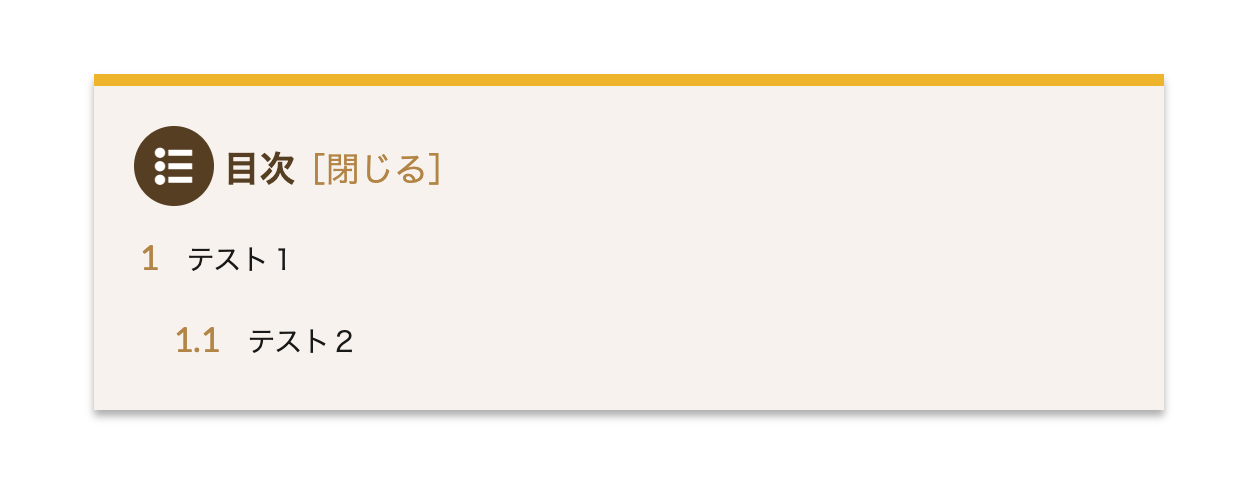
上記の SANGO風の目次に影を付けました。これだけでもだいぶ印象が変わりますね。
こちらの目次デザインもお気に入りです。
- CSSをコピペする
-
.content .outline{
position:relative;
width:90%;
margin:0 auto;
display:block;
background:#f7f2ec;
border-right:none;
border-left:none;
border-bottom:none;
border-top:solid 6px #efb509;
box-shadow: 0 3px 4px rgba(0, 0, 0, 0.32);
}
.content .outline__item{
background:#f7f2ec;
}
.content .outline__number{
background:none;
font-size:17px;
color:#b38540;
}
.outline__title:before{
display:inline-block;
font-family: "icomoon";
content: "\ea51";
margin-right:5px;
width:40px;
height:40px;
text-align:center;
background:#563e20;
border-radius:50%;
padding-top:4px;
color:#fff;
}
.outline__title{
color:#563e20;
font-weight:bold;
font-size:18px;
}
.content .outline__toggle:checked + .outline__switch::before {
content: "[閉じる]";
font-size:17px;
margin-left:-10px;
color:#b38540;
}
.content .outline__toggle:checked + .outline__switch + .outline__list {
margin-top: 1rem;
background:initial;
}
.content .outline__switch::before {
content: "[開く ]";
border: 0;
margin-left:-10px;
color:#b38540;
font-size:17px;
}
SANGO風3【開閉なし】
SANGO風の目次 3代目です。上記の次にリリースされたデザインと言う印象ですね。
シンプルでとてもオシャレな目次です。さすがsaruwakaさん。
- CSSをコピペする
-
.content .outline{
width:90%;
margin:0 auto;
display:block;
position:relative;
background: #f1f1f1;
border:none;
padding-top:0px;
}
.content .outline__item{
background: #f1f1f1;
}
.content .outline__number{
background:none;
font-size:17px;
color:#333;
border-radius:50%;
}
.content .outline__number:after{
content:".";
}
.content li ul li .outline__number{
background:transparent;
color:#555;
width:auto;
font-size:15px;
}
.outline__title:before{
font-family: "icomoon";
content: "\ea51";
margin-right:5px;
color:#fff;
}
.outline__title{
color:#fff;
font-weight:bold;
font-size:20px;
display:block;
text-align:center;
background:#5fc2f5;
margin-right:-20px;
margin-left:-20px;
padding:5px;
}
.content .outline__toggle:checked + .outline__switch::before {
content: "[閉じる]";
display:none;
}
.content .outline__toggle:checked + .outline__switch + .outline__list {
margin-top: 1rem;
background:initial;
}
.content .outline__switch::before {
content: "[開く ]";
display:none;
}
SANGO風4【開閉なし】
上記の SANGO風の目次に影を付けました。私たちのサイトでもつい最近まで採用されてた目次デザインです。
- CSSをコピペする
-
.content .outline{
width:90%;
margin:0 auto;
display:block;
position:relative;
background:#fffbf4;
border:none;
padding-top:0px;
box-shadow: 0 3px 4px rgba(0, 0, 0, 0.32);
border:solid 2px #fcd69e;
}
.content .outline__item{
background:#fffbf4;
}
.content .outline__number{
background:none;
font-size:17px;
color:#333;
border-radius:50%;
margin-right:0px;
}
.content .outline__number:after{
content:".";
}
.content li ul li .outline__number{
background:transparent;
color:#555;
width:auto;
font-size:15px;
margin-left:10px;
}
.outline__title:before{
font-family: "icomoon";
content: "\ea51";
margin-right:5px;
color:#555;
}
.outline__title{
color:#555;
font-weight:bold;
font-size:20px;
display:block;
text-align:center;
background:#fcd69e;
margin-right:-20px;
margin-left:-20px;
padding:5px;
}
.content .outline__toggle:checked + .outline__switch::before {
content: "[閉じる]";
display:none;
}
.content .outline__toggle:checked + .outline__switch + .outline__list {
margin-top: 1rem;
background:initial;
}
.content .outline__switch::before {
content: "[開く ]";
display:none;
}
サルワカさん風【開閉なし】

私たちが一番 苦労した目次デザインであり力作です。
上記の目次デザインは SANGO風でしたが、この目次デザインはその SANGOの創設者のサルワカさんのサイトで採用されてるデザインを再現してます。
- CSSをコピペする
-
/*サルワカ風の目次*/
.content .outline {
position:relative;
border: 3px solid #f89174;/*ボディのアウトライン*/
padding: 10px ;
padding-left:0px;
background:#fffbf4;/*ボディ内カラー*/
padding-top: 0px;
border-radius: 5px;/*ボーダーの角丸*/
border-top: none;
}

.content li ul li .outline__number{
color:#505050;/*リストの数字カラー*/
}
.content .outline__number{
background:initial;
font-weight:bold;
color:#555;
}

.content .outline__number::after {
position:absolute;
content: ".";
color: #505050;/*項目前のドットのカラー*/
font-weight: bold;
}
/*h3見出しのカラー*/
.outline__list .outline__list-3 .outline__link {
color: #666;/*文字カラー*/
}
.outline__list .outline__list-3 .outline__link:hover{
font-weight:normal;/*ホバー時のフォントサイズ*/
}
.content .outline__link {
transition-duration:0.4s;
display: block;
color:#505050;/*項目の文字カラー*/
padding-bottom: 8px;
letter-spacing:0.4px;
font-size: 18px ;
}

.content .outline__link:hover {
transition-duration:0.4s;
color: #e0e0e0;/*ホバー時の文字カラー*/
}

.outline__title {
color:#fff;/*目次タイトルの文字カラー*/
font-weight: bold;
font-size: 2rem;/*タイトルの大きさ*/
display: block;
text-align: center;
background-color: #f89174;/*タイトルの背景カラー*/
margin-right: -12px;
margin-left: -1px;
margin-top: 0px;
padding-top: 7px;
padding-bottom: 9px;
border-radius: 2px 2px 0 0 ;
}

.content .outline__toggle:checked + .outline__switch::before {
display:none;
}

.content .outline__toggle:checked + .outline__switch + .outline__list {
margin-top: 1rem;
background:initial;
}

.content .outline__switch + .outline__list {
background: transparent;
}

.content .outline__switch + ul.outline__list {
margin-left:0;
margin-right:0;
}

.content .outline__switch + .outline__list-2 li:first-child{
margin-top:1.0em;
}

.outline__title:before{
font-family: "Font Awesome 5 Free";
content: "\f00b";/*Font Awesome5のアイコン*/
margin-right:5px;
}
/*スマホの文字サイズと幅カスタマイズ*/
@media only screen and (max-width: 480px){
.content .outline__link{
font-size: 14px ;
margin-left: -10px;
}
}

/* 目次文頭揃え */
.outline__link {
padding-left:2em;
text-indent: -1em;
}

.outline__number{
text-indent: 0;
}

@media only screen and (min-width: 992px){
.outline__list-2 > li > a{
font-weight:700;
}

.content .outline {
width:90%;
margin:3rem 5%;
}
}

@media only screen and (max-width: 991px){
.content .outline {
width:100%;
}
}
みなさんこんにちは。 THE THOR(ザ・トール)のカスタマイズにハマりすぎて、朝起きたら"現代アート"みたいな寝グセになる Jonyと Ai(@10to1_travel)です。 アートと言えば、サルワカさん(@sa[…]
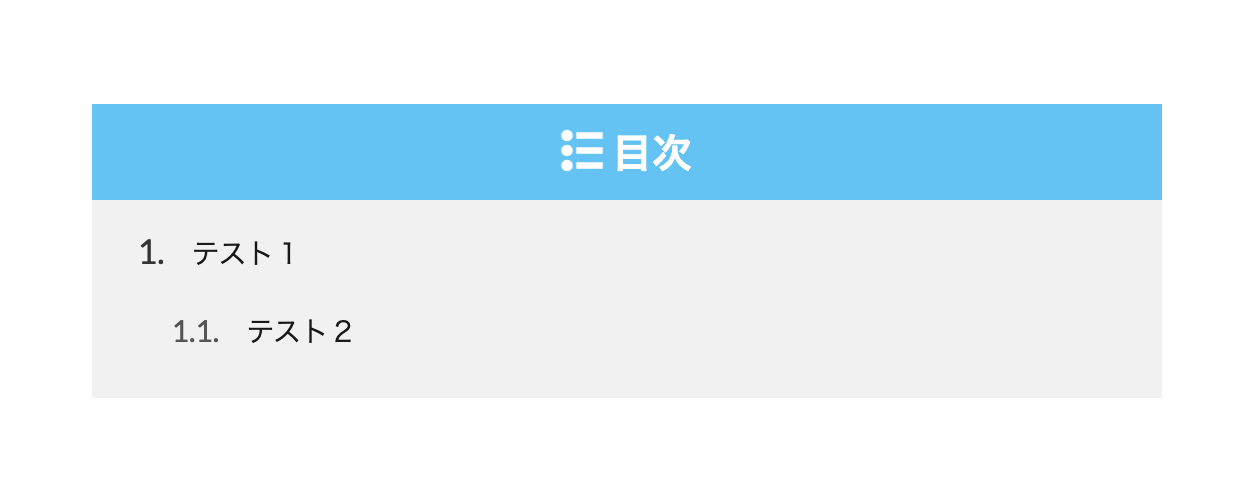
シンプルゴージャス(JIN風)
シンプルかつゴージャス感が出る目次デザインです。土台は WordPressの有料テーマ JINをモチーフにしてます。
- CSSをコピペする
-
.content .outline{
border:1px solid #ddc96c;
width:90%;
display:block;
margin:0 auto;
position:relative;
}
.outline__title{
display:block;
text-align:center;
}
.content .outline__number{
background:none;
color:#ddc96c;
font-size:18px;
}

.content .outline__number{
width:2em;
height:2em;
padding:0;
line-height:2em;
text-align:center;
background:none;
border-right:solid 2px #ddc96c;
}
.content .outline__link{
color:#333;
}
.content .outline__toggle:checked + .outline__switch::before {
content: "CLOSE";
border:none;
position:absolute;
right:50px;
top:22px;
color:#707070;
background:#f2f2f2;
border-radius:0px;
}
.content .outline__toggle:checked + .outline__switch + .outline__list {
margin-top: 1rem;
}
.content .outline__switch::before {
content: "OPEN";
border:none;
position:absolute;
border-radius:0px;
right:50px;
top:22px;
color:#707070;
background:#f2f2f2;
}
@media only screen and (max-width: 480px){
.content .outline__toggle:checked + .outline__switch::before {
content: "CLOSE";
border:none;
position:absolute;
right:20px;
top:15px;
color:#707070;
background:#f2f2f2;
border-radius:0px;
}
.content .outline__toggle:checked + .outline__switch + .outline__list {
margin-top: 1rem;
background:initial;
}
.content .outline__switch::before {
content: "OPEN";
border:none;
position:absolute;
border-radius:0px;
right:20px;
top:15px;
color:#707070;
background:#f2f2f2;
}
}
AFFINGER風
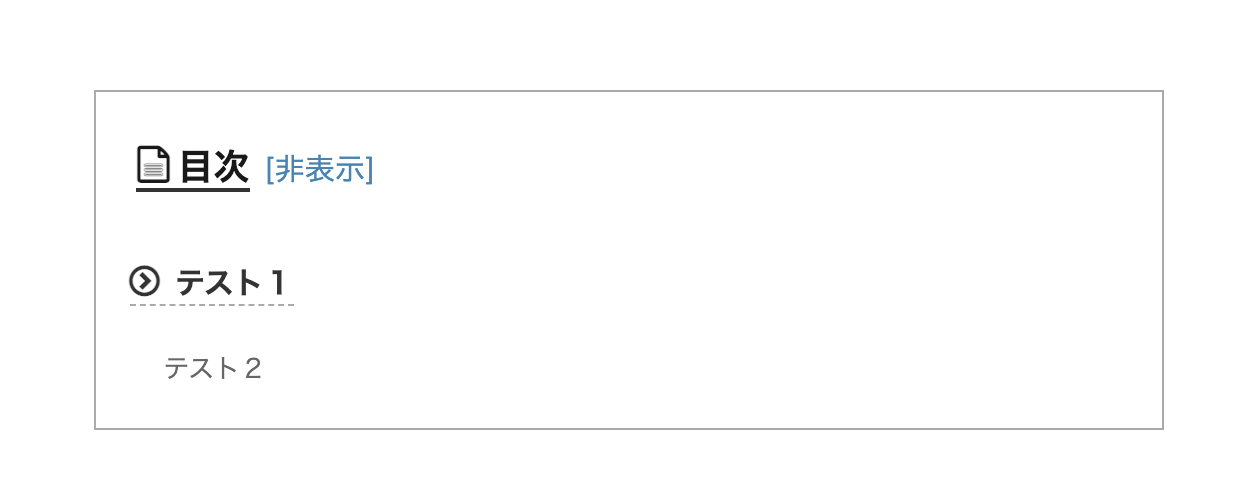
WordPress有料テーマの AFFINGER風の目次デザインです。少し違いますが、使い勝手の良いシンプルなデザインです。
- CSSをコピペする
-
.content .outline{
border:1px solid #aaa;
width:90%;
display:block;
margin:0 auto;
position:relative;
}
.outline__title{
font-weight:bold;
font-size:18px;
border-bottom:solid 2px #333;
}
.outline__title:before{
font-family: "icomoon";
content: "\e92f";
margin-right:3px;
font-weight:bold;
}
.content .outline__number{
display:none;
}
.content .outline__link:before{
font-family: "icomoon";
content: "\ea44";
margin-right:5px;
}
.content .outline__link{
color:#333;
font-size:15px;
font-weight:bold;
border-bottom:dashed 1px #aaa;
}
.outline__list .outline__list-3 .outline__link {
color: #666;
font-size:13px;
font-weight:normal;
border-bottom:none;
}
.outline__list .outline__list-3 .outline__link:before{
display:none;
}
.content .outline__switch + .outline__list-2 li:first-child{
margin-top:2rem;
}

.content .outline__toggle:checked + .outline__switch::before {
content: "[非表示]";
border:none;
color:#4682b4;
font-size:15px;
margin-left:0px;
}
.content .outline__toggle:checked + .outline__switch + .outline__list {
margin-top: 1rem;
background:initial;
}
.content .outline__switch::before {
content: "[表示]";
border:none;
color:#4682b4;
font-size:15px;
margin-left:0px;
}
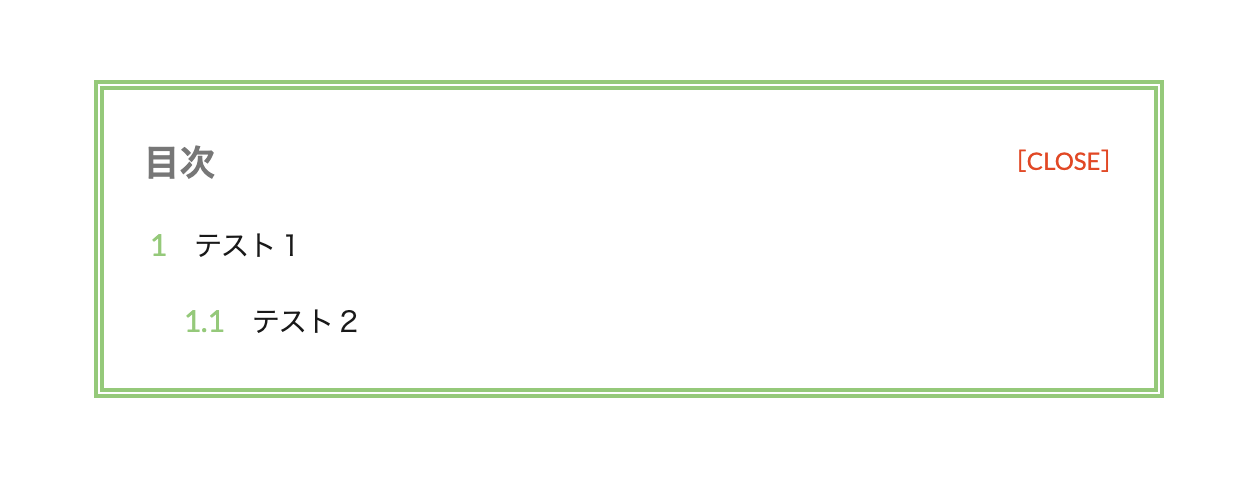
ここあさん参照の目次
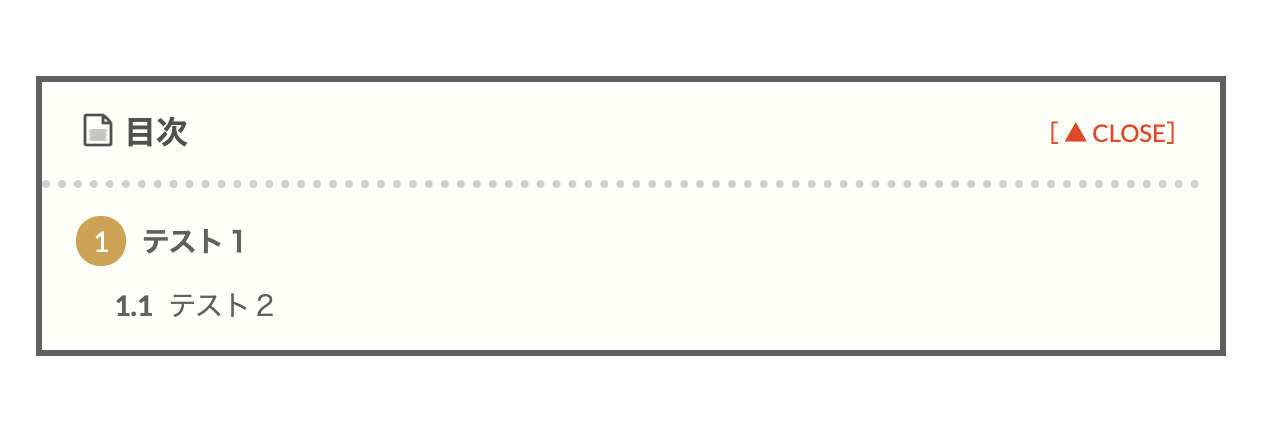
最初にも述べた、ここあさんの目次カスタマイズを参考にさせていただいたデザインです。
とてもオシャレで、正直 THE THOR(ザ・トール)ユーザーの多くが採用するほどの人気です。私たちも最初の 1年はこの目次を使用してました。
- CSSをコピペする
-
/*目次 カスタマイズ*//*目次 ボディ*/
.content .outline {
position:relative;
border: 3px solid #606060;
padding: 10px ;
padding-left:0px;background:#fffff9;
}
/*H2見出しの番号*/
.content .outline__number{
width:1.8em;height:1.8em;
padding:0;
line-height:1.8em;
text-align:center;
background:#cda34f;
color:#ffffff;
border-radius:50%;
}
/*H3見出しの番号*/
.content li ul li .outline__number{
font-weight:bold;
background:transparent;
color:#606060;
width:auto;
}
/*テキストカラー*/
.content .outline__link {
transition-duration:0.2s;
display: block;
color:#606060;
}
/*マウスオーバー時のホバーエフェクト*/
.content .outline__link:hover {
transition-duration:0.2s;
color:#cda34f;
}
/*目次タイトル*/
.outline__title {
color:#505050;
font-weight: 700;
width:100%;
padding: 0px 0px 0px 20px;
}.content .outline__switch{
right:1.5rem;
top:10px;
}
/*OPEN CLOSEのカスタマイズ*/
.content .outline__toggle:checked + .outline__switch::before {
content: "[ ▲ CLOSE]";
position:absolute;
right:10px;
color:#e34717;
}
.content .outline__toggle:checked + .outline__switch + .outline__list {
margin-top: 1rem;
background:initial;
}
.content .outline__switch::before {
content: "[ ▼ OPEN ]";
border: 0;
position:absolute;
right:10px;
color:#e34717;
}
/*ボーダー装飾*/
.content .outline__switch + .outline__list {
background: transparent;
}
.content .outline__switch + ul.outline__list {
margin-left:0;
margin-right:0;
border-top:4px dotted #cfcfcf;
}
.content .outline__switch + .outline__list-2 li:first-child{
margin-top:1.0em;
}
.content .outline__switch + .outline__list-2 li ul li:first-child{
margin-top:0.5em;
}
.outline__list-2 > li > a{
font-weight:700;
}
/*タイトル横のアイコン*/
.outline__title:before{
font-family: "icomoon";
content: "\e92f";
margin-right:5px;
}
/* 目次の頭揃え */
.outline__link {
padding-left:2em;
text-indent: -2em;
}
.outline__number{
text-indent: 0;
}
.outline__list-3 .outline__link {
padding-left:3em;
text-indent: -2.85em;
}
@media only screen and (min-width: 992px){
.outline__list-2 > li > a{
font-weight:700;
}
.content .outline {
width:90%;
margin:3rem 5%;
}
}
@media only screen and (max-width: 991px){
.content .outline {
width:100%;
}
}
ここあです。 WordPressテーマ「THE THOR」には デフォルトで記事の目次を表示させる機能があるので …
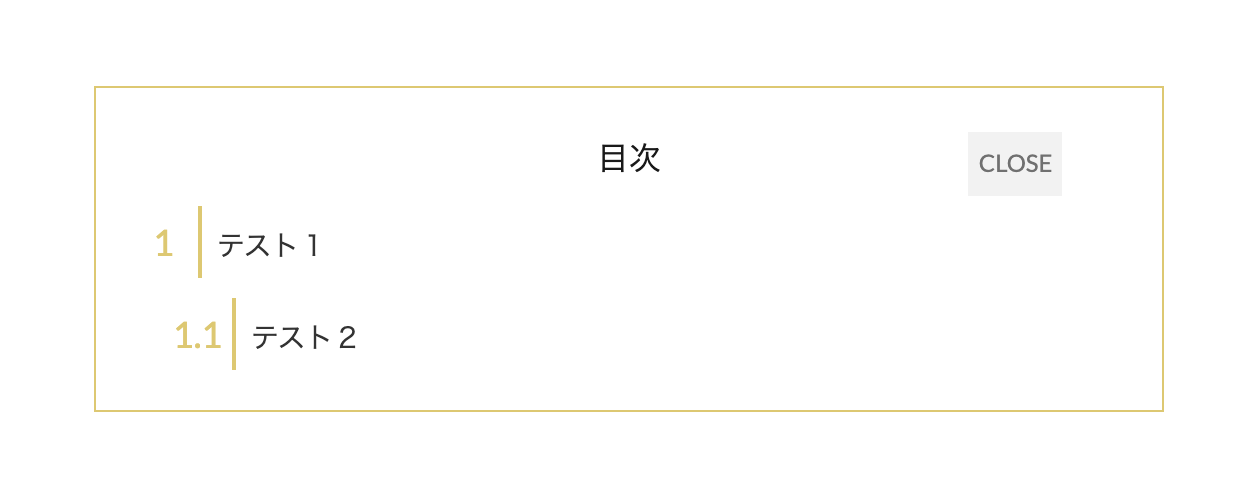
10to1オリジナル目次
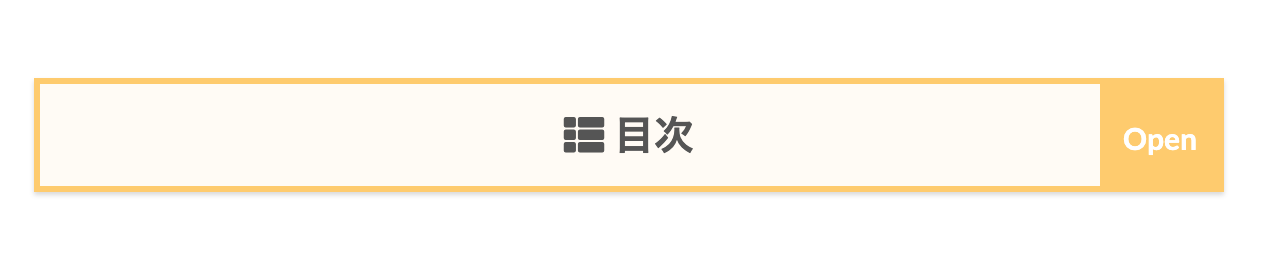
私たちのサイトで採用してた 10to1オリジナル目次です。
この目次は閉じた状態で設置することを目的としたデザインで、だからこそ[OPEN]と[CLOSE]を目立たせたデザインにしました。
シンプルですが、かなり使いやすくオシャレに仕上がりました。
しかしひとつ問題があり、この目次はサイトによって開閉ボタンのデザインが少し崩れます。使用するときはサイトによって微調整してください。
- CSSをコピペする
-
.content .outline {
position:relative;
border:solid 3px #ffcc66;
background:#fffbf4;
padding:5px;
box-shadow: 0 1.5px 2.4px rgb(0 0 0 / 15%);
}
.outline__list .outline__list-3 .outline__link {
color: #666;
font-weight:normal;
font-size:17px;
}
.outline__list .outline__list-3 .outline__link:hover{
color:#f89174;
font-weight:normal;
}
.content li ul li .outline__number{
font-weight:bold;
background:transparent;
color:#505050;
width:auto;
display:none;
}
.outline__list-3 .outline__link:before{
content:"・";
font-weight:bold;
}
.content .outline__number{
position: relative;
color:#505050;
background-color:transparent;
}

.content .outline__number::after {
position:absolute;
content: ".";
color: #505050;
font-weight: bold;
}
.content .outline__link {
transition-duration:0.2s;
display: block;
color:#555;
padding-bottom: 5px;
font-size: 18px ;
}
.content .outline__link:hover{
color:#f89174;
}
.outline__title {
color:#555;
font-weight: bold;
font-size: 2rem;
display: block;
text-align:center;
padding-top:2px;
padding-bottom:2px;
}

.content .outline__toggle:checked + .outline__switch::before {
content: "Close";
padding-right:7px;
padding-left:7px;
padding-top: 15px;
font-weight:bold;
font-size:15px;
text-align:center;
height:52px;
width:60px;
position:absolute;
right:-1px;
color:#fff;
background:#ffcc66;
border-top:none;
border-right:none;
border-left: none;
border-radius:0px;
margin-top:-1px;
}
.content .outline__toggle:checked + .outline__switch:hover:before{
transition:0.2s;
background:#f89174;
}
.content .outline__toggle:checked + .outline__switch + .outline__list {
margin-top: 1rem;
background:initial;
}

.content .outline__switch:before {
content: "Open";
padding-top: 15px;
padding-right:7px;
padding-left:7px;
transition:0.2s;
font-weight:bold;
font-size:15px;
text-align:center;
height:52px;
width:60px;
position:absolute;
right:-1px;
top:0px;
color:#fff;
background:#ffcc66;
border-top:none;
border-bottom:none;
border-right:none;
border-left:none;
border-radius:0px;
margin-top:-1px;
}
.content .outline__switch:hover:before{
transition:0.2s;
background:#f89174;

}
.content .outline__switch + .outline__list {
background: transparent;
}
.content .outline__switch + ul.outline__list {
margin-left:0;
margin-right:0;
}

.content .outline__switch + .outline__list-2 li:first-child{
margin-top:1.0em;
}

.content .outline__switch + .outline__list-2 li ul li:first-child{
margin-top:0.5em;
}

.outline__list-2 > li > a{
font-weight:700;
}

.outline__title:before{
font-family: "Font Awesome 5 Free";
content: "\f00b";
margin-right:5px;
}
@media only screen and (max-width: 480px){
.content .outline__link{
font-size: 15px ;
margin-left: -10px;
}
.outline__list .outline__list-3 .outline__link {
font-size: 13px;
}
}

/* 目次文頭揃え */
.outline__link {
padding-left:1em;
text-indent: -1em;
}
.outline__number{
text-indent: 0;
}

@media only screen and (min-width: 992px){
.outline__list-2 > li > a{
font-weight:700;
}

.content .outline {
width:90%;
margin:3rem 5%;
}
}

@media only screen and (max-width: 991px){
.content .outline {
width:100%;
}
}
左線あり目次
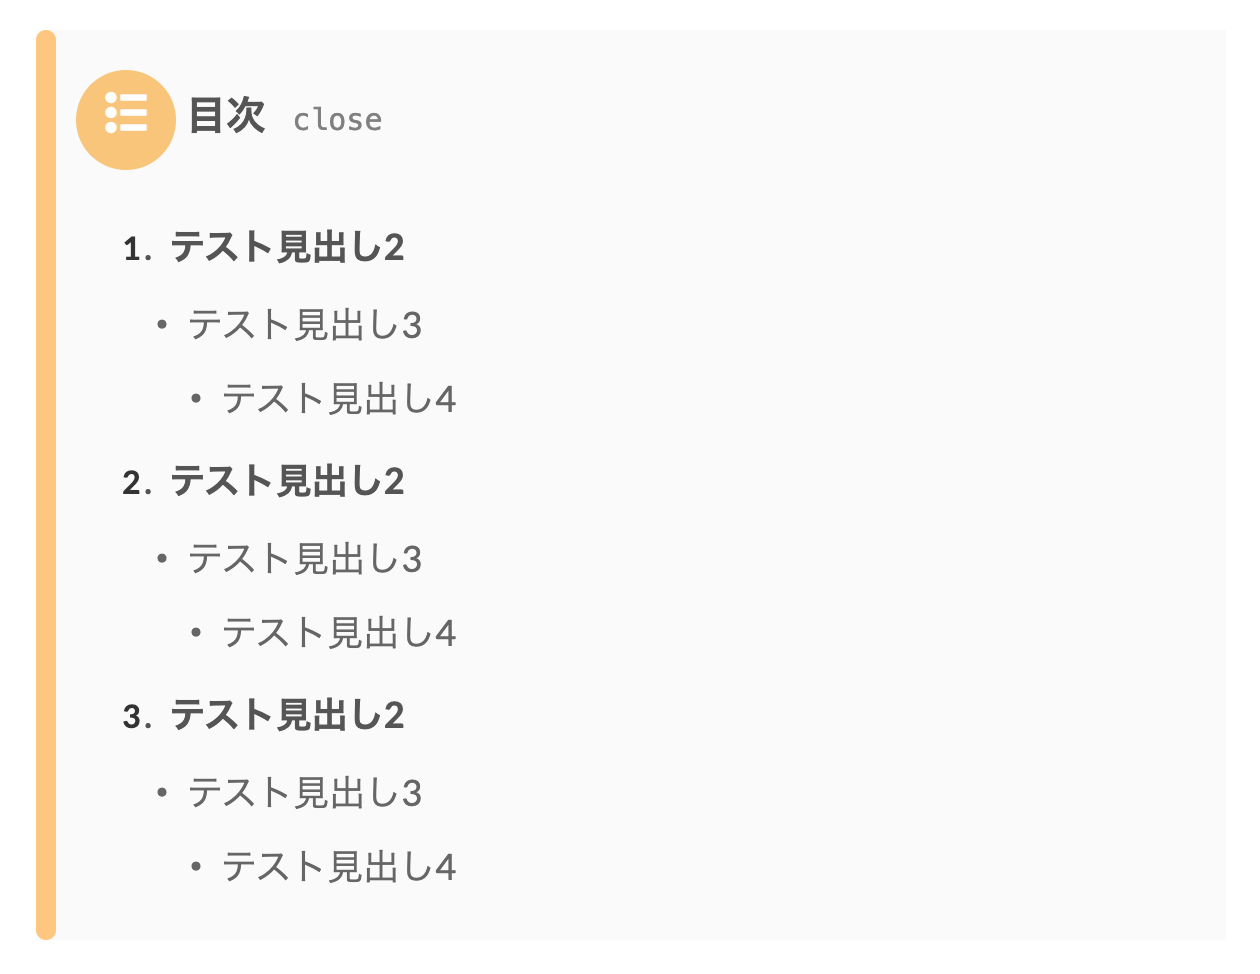
2021年12月に完成した目次です。左に角丸の線があるのがポイントです。角丸にした理由は h2見出しとデザインが被るからです。
- タイトル
-
/*目次*/
.content .outline{
position:relative;
margin:0 auto;
display:block;
background:#fafafa;
border: none;
padding-left:2rem;
}
.content .outline:before{
position: absolute;
content:"";
top: 0;
left: 0;
border-radius: 5px;
width: 10px;
height: 100%;
background: #ffc778;/*左線カラー*/
}
.content .outline__item{
background:initial;
}
.content .outline__switch + .outline__list {
background: transparent;
}
.content .outline__switch + ul.outline__list {
margin-left:0;
margin-right:0;
}

.content .outline__switch + .outline__list-2 li:first-child{
margin-top:1.0em;
}

.content .outline__switch + .outline__list-2 li ul li:first-child{
margin-top:0.5em;
}

.outline__list-2 > li > a{
font-weight:700;
}
.content .outline__number{
font-size:16px;
color:#333;
position: relative;
background-color:transparent;
font-weight:bold;
}
.outline__title:before{
display:inline-block;
font-family: "icomoon";
content: "\ea51";
margin-right:5px;
width:50px;
height:50px;
padding-top:3px;
text-align:center;
background:#fac674;
border-radius:50%;
color:#fff;
}
.outline__title{
color:#555;
font-weight:bold;
font-size:2rem;
}

.content .outline__toggle:checked + .outline__switch::before {
content: "close";
font-family: Menlo,Monaco,Consolas,"CourierNew",monospace;
font-size:1.5rem;
color:gray;
border:none;
transition:.2s;
}
.content .outline__toggle:checked + .outline__switch + .outline__list {
margin-top: 1rem;
transition:.2s;
}
.content .outline__switch::before {
content: "open";
font-family: Menlo,Monaco,Consolas,"CourierNew",monospace;
border:none;
color:gray;
font-size:1.5rem;
transition:.2s;
}
.outline__list .outline__list-3 .outline__link {
color: #666;
font-weight:normal;
}
.outline__list .outline__list-3 .outline__link:hover{
font-weight:normal;
color:#f89174;
}
.content li ul li .outline__number{
font-weight:bold;
background:transparent;
color:#505050;
width:auto;
display:none;
}
.content .outline__link {
transition-duration:0.2s;
display: block;
color:#555;
padding-bottom: 3px;
font-size: 18px ;
font-weight:bold;
text-decoration:none;
}
.content .outline__link:hover{
color:#f89174;
text-decoration:none;
}
.outline__list-3 .outline__link:before{
content:"・";
font-weight:bold;
}
.content .outline__number::after {
position:absolute;
content: ".";
color: #555;
font-weight: bold;
margin-left:2px;
}
.content .outline__switch:hover:before{
transition:0.2s;
color: #f89174;
}
.content .outline__toggle:checked + .outline__switch:hover:before{
transition:0.2s;
color:#f89174;
}
@media only screen and (max-width: 480px){
.content .outline__link{
font-size: 15px ;
margin-left: -10px;
}
.outline__list .outline__list-3 .outline__link {
font-size: 13px;
}
}
THE THOR 目次カスタマイズを調節する方法
上記の目次を「もっと自分のサイトに合うデザインにカスタマイズしたい!」と思いますよね。
そんなあなたのために、超初心者向けの誰でもできる簡単な調節の方法をご紹介します!
- 文字の色を変更する
- 背景の色を変更する
- ボーダーを変更する
- アイコンを変更する
色を変更する際は #から始まる 6桁のカラーコード(例:#000000)を使用します。カラーコードは私たちが参考にしてる原色大辞典が便利です。
※CSSを編集する時は、必ず「:;」で挟んでください。「:;」のどちらかを忘れるとコードがうまく表示されません。
文字の色を変更する
目次の文字の色を変更する方法です。文字の色を変更するには以下のコード部分を編集します。
color:#000000;
colorとはテキストの色を変更するための CSSのプロパティ(値)です。
あなたが変更したい文字のカラーコードを希望の色に変更してご使用ください。
例えば、カラーコードの入力方法は以下の通りです。
- color:#ff7f50;
- color:#1e90ff;
- color:#674196;
背景の色を変更する
目次の背景の色を変更する方法です。背景色を変更するには以下のコード部分を変更します。
background:#000000;
backgroundとは背景色を変更するための CSSのプロパティ(値)です。
あなたが変更したい背景色のカラーコードを希望の色に変更してご使用ください。
例えば、カラーコードを入力すると以下のようになります。
background:#fcd575;
background:#98d98e;
background:#fdeff2;
ボーダーを変更する
目次のボーダーの色・太さ・種類を変更する方法です。ボーダーを変更するには以下のコード部分を変更します。
border:solid(種類) 3px(太さ) #000000(色);
borderは 3つの要素を入れて使用します。3つの要素は上記のように半角スペースを入れて羅列してください。
3つの要素(種類・太さ・色)については以下を参照ください。
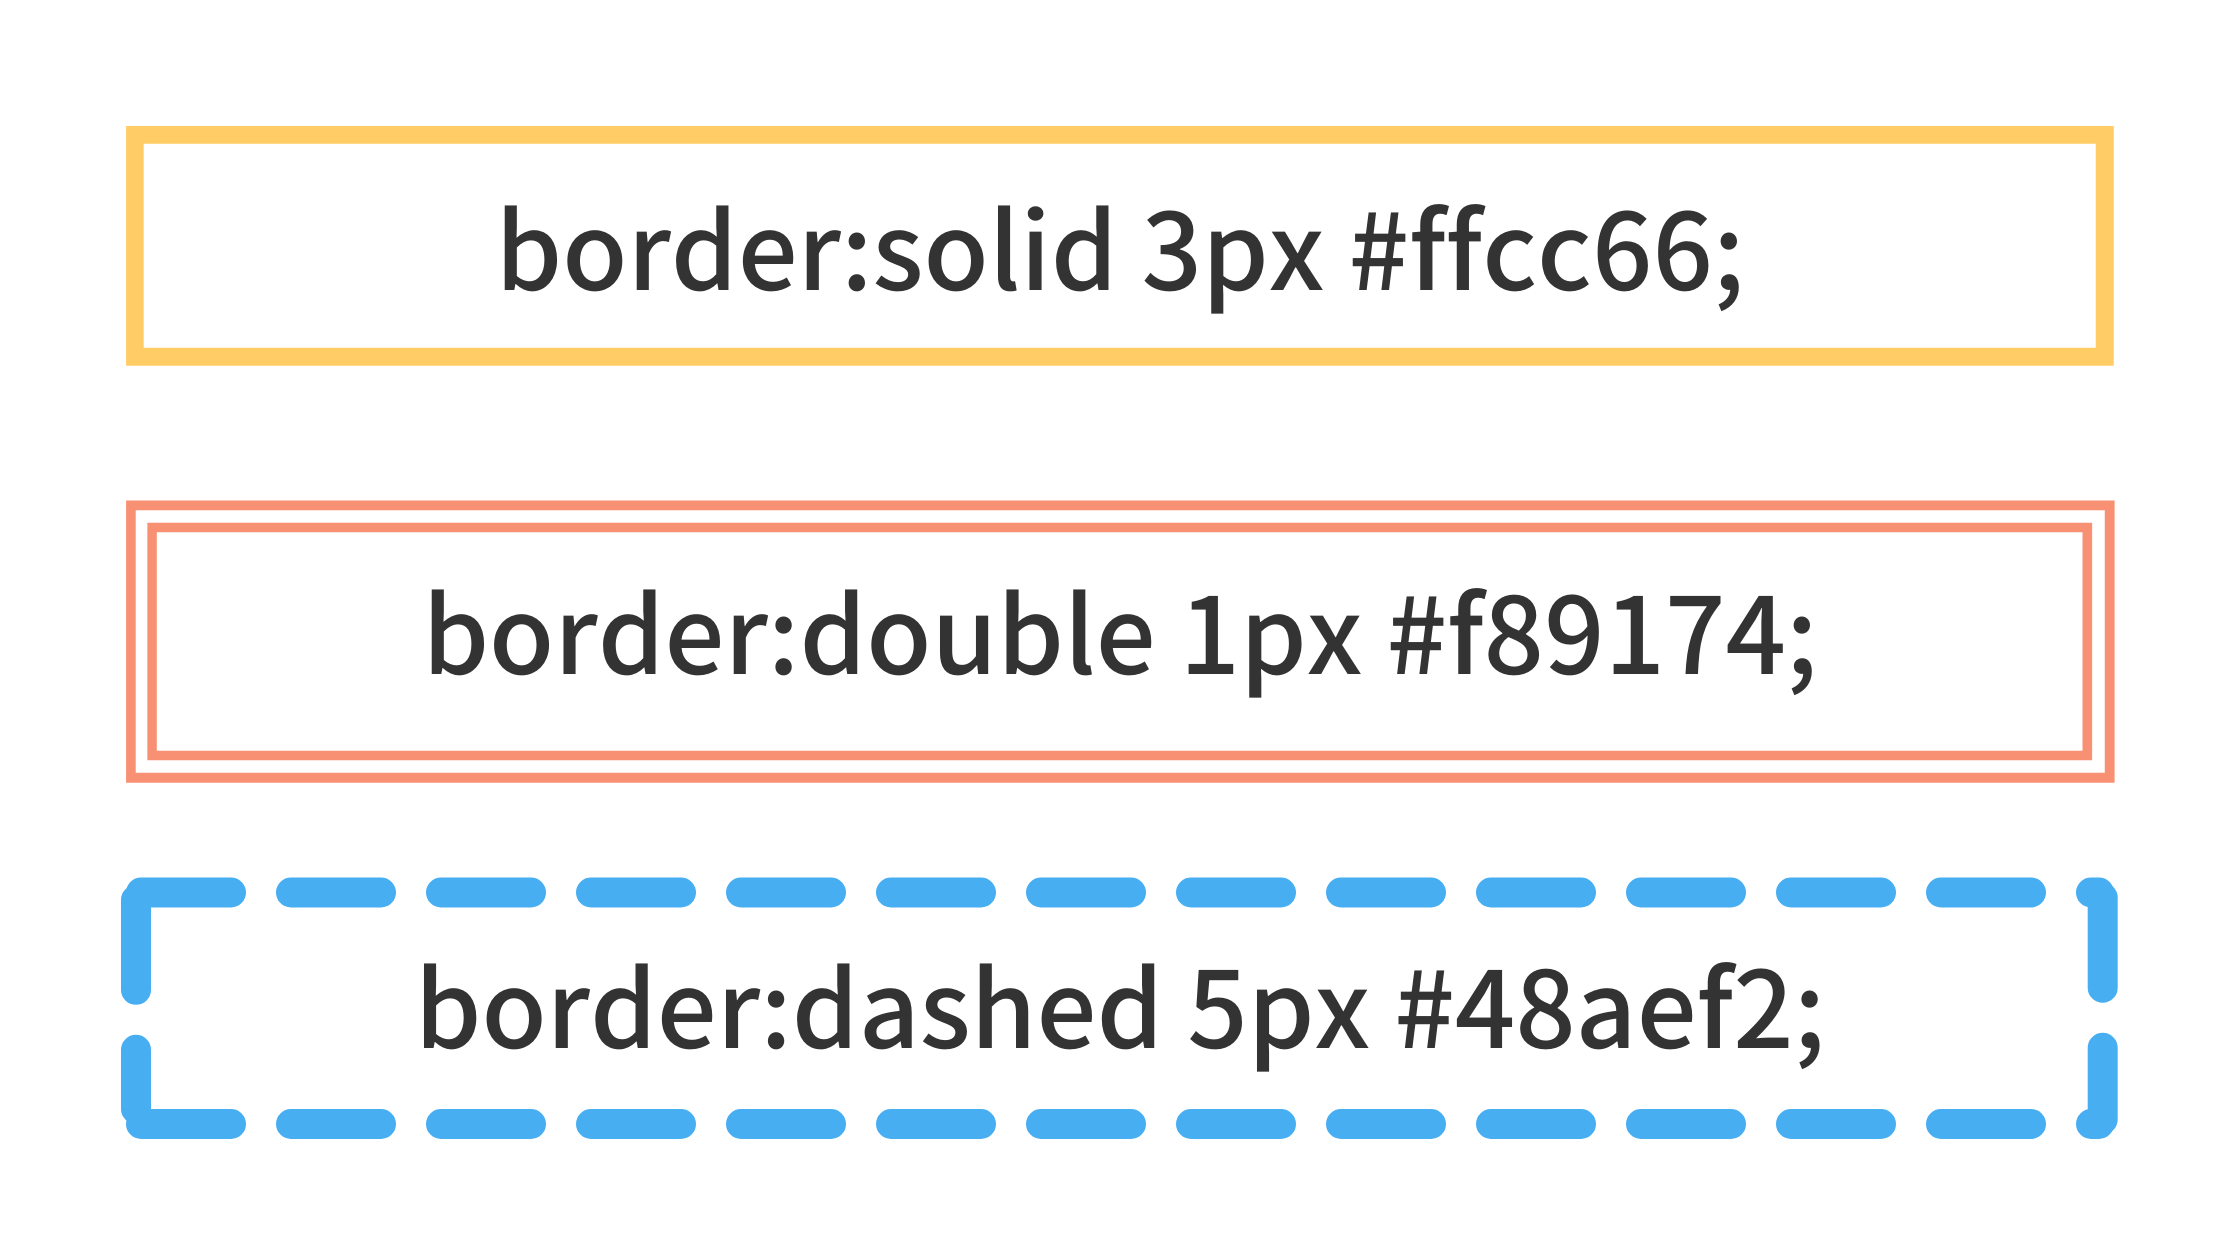
ボーダーの種類
| solid | 一本線(デフォルト) |
| double | 二重線 |
| dashed | 破線 |
| dotted | 点線 |
ボーダーの太さ
ボーダーの太さは ○pxで指定します。数値が大きくなるほど線が太くなります。
サイトでは基本的に 1〜5px内で使用されることが多いです。
ボーダーの色
ボーダーの色は #から始まる 6桁のカラー番号で指定します。変更したいカラー番号を入力してください。
例えば、カラーコードを変えると以下のようになります。
- color:#ff7f50;
- color:#1e90ff;
- color:#674196;
上記を踏まえて、作成するボーダーの例は以下のようになります。
アイコンを変更する
少しレベルが上がりますが、アイコンを変更する方法です。
アイコンを変更するにはアイコンコードを使用します。アイコンコードは使うアイコンによって利用するコードが違います。
アイコンを変更するには以下のプロパティを編集します。
content:”\f00b”;
アイコンコードは\f00bの部分です。
アイコンを使用する際の注意事項です。
- アイコンコードは必ず《 “” 》で挟んで使用する
- アイコンコードの前には必ずバックスラッシュ《 \ 》を付ける
- どのサイトから使用したかを CSSに追記する
アイコンを使用する際は、contentのプロパティとセットで font-familyプロパティでサイトのコードを追記します。
アイコンコードの参照は 2つのサイトを利用します。
- Icomoon(アイコムーン)
- FontAwesome(フォントオーサム)
Icomoonは THE THORで使用してるアイコンですので設定はアイコンコードを設置するだけで OKです。
FontAwesomeはウェブ界でとても有名なサイトサービスですので、コチラもオススメです。ただし、利用するには少し設定が必要ですので、ご紹介します。
これらのサイトから使用する場合のコードは以下のようになります。
Icomoonの場合
font-family: "icomoon";
content: "\e92f";
FontAwesomeの場合
font-family: "Font Awesome 5 Free";
content: "\f00b";
Font Awesomeを使用するには無料登録と設定が必要です。手順通りにすれば 5分で完了するのでサクッと設定しましょう。
詳しくは以下の記事をご覧ください。
>>【THE THOR向け】初心者でも簡単!Font Awesomeを導入する方法
Ai 無料アイコンが使い放題!Font Awesomeを THE THOR(ザ・トール)に導入する方法を紹介するよ! こんな人にオススメ THE THORでオシャレなアイコンを使いたい記事内でTwitterやチ[…]
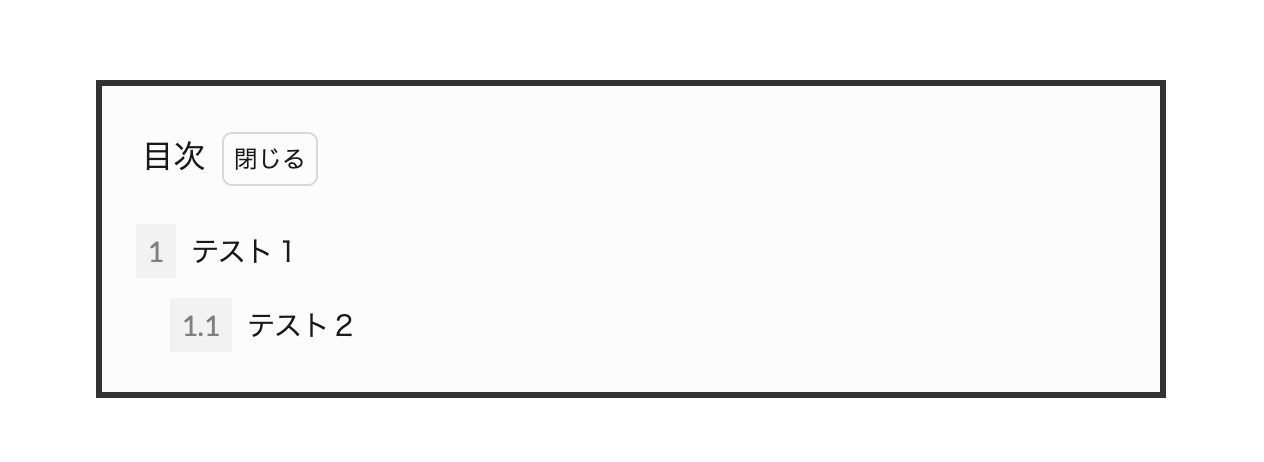
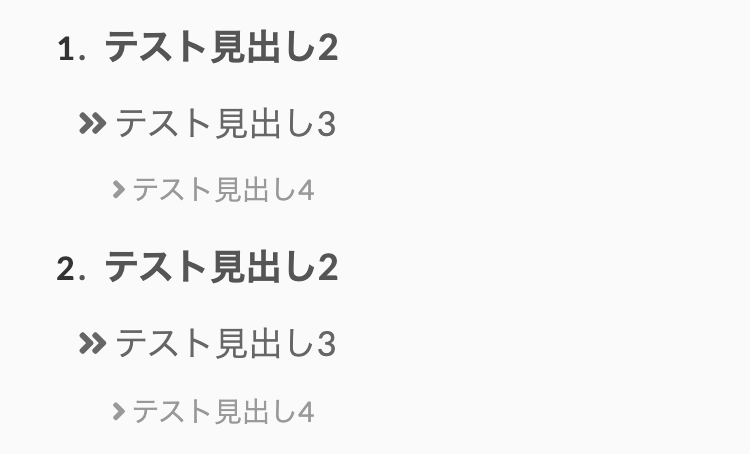
h3・h4見出し前のアイコンを変更する
目次に表示する見出しが h3・h4までの人もいらっしゃると思います。その場合、この記事のカスタマイズだと「2-1、2-2」のような表示のされ方になってしまいます。
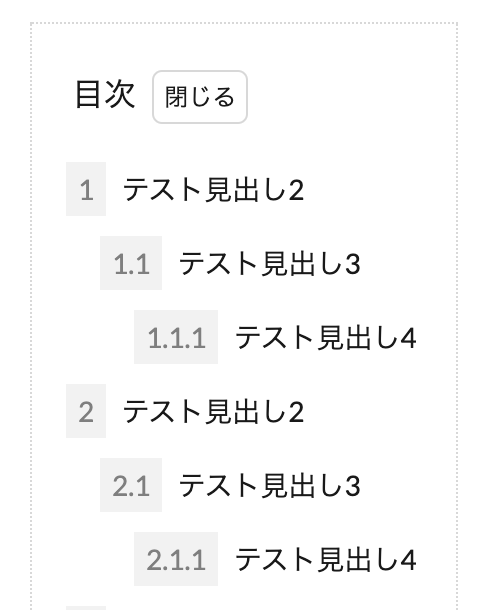
ご覧のように、h3が「1.1」、h4が「1.1.1」と表示されて、やや見にくいですね。
こちらをシンプルなアイコンに変更していきます。希望のアイコンに変更したい場合は、上記のアイコンの変更方法を参考にしてくださいね。
まずは、h3・h4見出し前の数字( 2.1や 2.2など)を非表示にするために、以下のコードをコピペします。
h3・h4見出し前のアイコンを非表示
.outline__list .outline__list-3 .outline__number, .outline__list .outline__list-4 .outline__number{
display:none;
}
これを追記しないと数字が表示されたままになります。
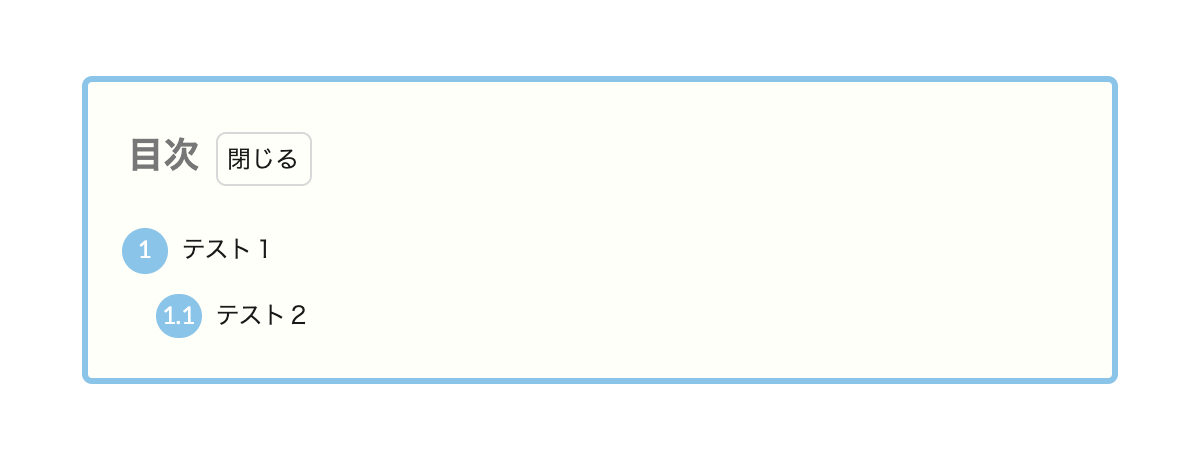
h3・h4アイコンを変更する
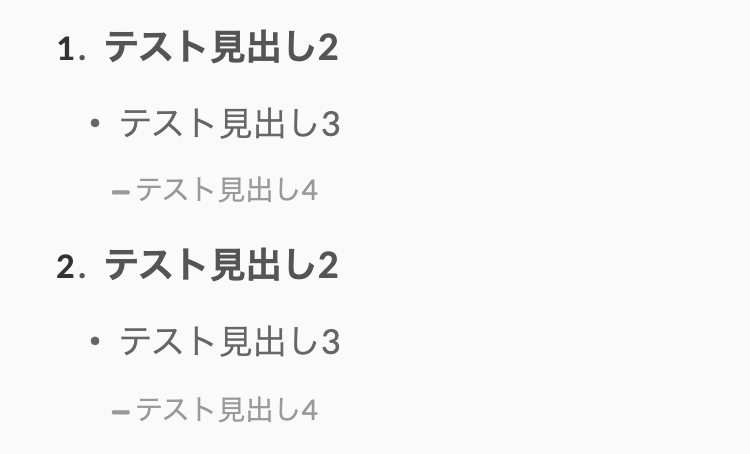
h3見出しが「・」、h4見出しが「-」にしました。この案は小島さん(@kotarofujimino)からリクエストいただきました。
さらに、h2と見分けをつけるために h3と h4共にサイズを小さく、色を薄く設定してます。
不要の場合は消去してください。
/*h3見出しアイコン*/
.outline__list-3 .outline__link:before{
content:"・";
font-weight:bold;
}
/*h4見出しアイコン*/
.outline__list-4 .outline__link:before{
font-family:"Font Awesome 5 Free";
content:"\f068";
font-weight:900;
font-size:.4rem;
}
/*h3見出しサイズ・色調節*/
.outline__list-3 .outline__link {
color: #666 !important;/*h3文字カラー*/
font-size:17px;/*h3文字サイズ*/
}
/*h4見出しサイズ・色調節*/
.outline__list-4 .outline__link{
font-size:14px;/*h4文字サイズ*/
color:#999 !important;/*文字カラー*/
}
h3・h4見出し前アイコン:パターン2
矢印パターンも作ってみました。矢印の数を減らすことによって見出しの大きさを表現してます。
/*h3見出しアイコン*/
.outline__list-3 .outline__link:before{
font-family:"Font Awesome 5 Free";
content:"\f101";
font-weight:900;
}
/*h4見出しアイコン*/
.outline__list-4 .outline__link:before{
font-family:"Font Awesome 5 Free";
content:"\f105";
font-weight:900;
}
.outline__list-3 .outline__link {
color: #666;
font-size:17px;/*h3文字サイズ*/
}
.outline__list-4 .outline__link{
font-size:14px;/*h4文字サイズ*/
color:#999 !important;/*文字カラー*/
}
THE THORの目次をカスタマイズする時の注意点
今回 THE THOR(ザ・トール)の目次カスタマイズのデザインには【開閉あり】と【開閉なし】があります。
分けてる理由は、各々で表現できるデザインが違うからです。なので、【開閉なし】に開閉ボタンを表示するとデザインが崩れる可能性があります。
また、サイトによってはデザインが崩れる可能性があります。原因は併用してる他の CSSの影響などです。その場合はお問い合わせいただくか、CSSに詳しい人は微調整を行ってください。
導入済みのブログを紹介させてください!

「この記事を見てカスタマイズ導入したよ!」という人で、SNSやブログでこの記事を紹介していただいた場合、このブログで紹介させていただきます!
手順
- 当記事のカスタマイズをあなたのサイトに導入する
- ブログもしくはSNSでこの記事をシェアする
- 当記事内であなたのブログを紹介させていただく
SNSの場合は、私たちのアカウントのタグを付けてください。そうしないとシェアしていただいたことに気づくことができません。
ブログの場合は、外部リンク(テキストでもカード型でも可)を設置したのち、当サイトのお問い合わせからご連絡ください。
たくさんの人に導入していただきたいので、ご連絡お待ちしております!
このカスタマイズを導入していただいたサイト様
- シンプルライフを行うためのメンタル講座 / タライ・ラーマくん(@BestlifeSimple)
- Moon Style / むーんさん(@moonmoon0969)
- りゅうの夕暮れ / りゅうさん(@ryubloggg)
THE THOR コピペで作る目次デザインのカスタマイズ:まとめ
今回は THE THOR(ザ・トール)の目次デザインをコピペだけでおしゃれにカスタマイズしました。
目次はユーザーに記事の内容を伝えるための非常に重要な役割を果たします。デザインを行うことにより、よりユーザーに分かりやすくすることができるのでしっかり設定しておきましょう。
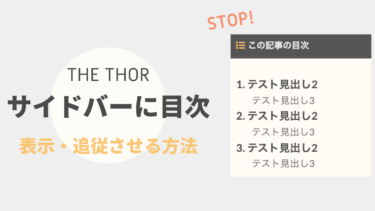
他にも、THE THOR(ザ・トール)のサイドバーエリアに目次を表示・追従させる方法を紹介してます。そちらも合わせてご覧ください。
>>回遊率UP!THE THORのサイドバーに目次を表示・追従させる方法
みなさんこんにちは。 サイドバーに目次を表示したい!と思ったことありませんか?しかし、THE THOR(ザ・トール)にはサイドバーに目次を設置できる機能はありません。 今回は、どーしても THE THOR(ザ・トー[…]
今回の記事で何か分からない部分、もっと知りたいこと、カスタマイズデザインのリクエストなどありましたらどんな些細なことでもご質問ください!
常時、お問い合わせもしくは Twitterの DMにて受け付けております。
最後まで読んでいただきありがとうございます。
おわり
- 2022年1月31日
- THE THORのカスタマイズ
- CSSカスタマイズ, THE THOR